# Find all DHCP Server in Domain
$DhcpServers = Get-DhcpServerInDC
foreach ($DHCPServer in $DhcpServers.DnsName){
if (Test-Connection -BufferSize 32 -Count 1 -ComputerName $dhcpserver -Quiet){
$ErrorActionPreference = “SilentlyContinue”
$Scopes = Get-DhcpServerv4Scope -ComputerName $DHCPServer
#For all scopes in the DHCP server, get the scope options and add them to $LIstofSCopesandTheirOptions
foreach ($Scope in $Scopes){
$LIstofSCopesandTheirOptions += Get-DHCPServerv4OptionValue -ComputerName $DHCPServer -ScopeID $Scope.ScopeId | Select-Object @{label=”DHCPServer”; Expression= {$DHCPServer}},@{label=”ScopeID”; Expression= {$Scope.ScopeId}},@{label=”ScopeName”; Expression= {$Scope.Name}},@{Name=’Value’;Expression={[string]::join(“;”, ($_.Value))}},*
}
$LIstofSCopesandTheirOptions += Get-DHCPServerv4OptionValue -ComputerName $DHCPServer | Select-Object @{label=”DHCPServer”; Expression= {$DHCPServer}},@{Name=’Value’;Expression={[string]::join(“;”, ($_.Value))}},*
$ErrorActionPreference = “Continue”
}
}
#Now we have them all, output them
$LIstofSCopesandTheirOptions | Export-Csv -Path c:\temp\DhcpOptionsReport.csv -Force
#$ListofScopesandTheirOptions | Out-GridView
#
In this article, we are going to explore the possibility to migrate from Exchange Server 2010 to Exchange Server 2019. We have taken Exchange Server 2010 (since its reaching end of life and support) and Exchange Server 2019 (being the newest Exchange Server available). For the sake of this article, we are going to work on a single instance of Exchange Server 2010 as there are a good number of setups and configurations which are impossible to cover. Being a Database Availability Group (DAG) or a single instance, most of the migration checklist can be applied to both cases.
9 Steps total
Step 1: Things to Consider before Migrating
Let’s start off with the considerations, we need to check, before migrating and then we explore them bit-by-bit.
Infrastructure changes
Resources needed
Software needed
Network changes
Client software and device support
Other considerations
Step 2: Data Collection of Current Setup
The next thing you need to do is to assess and get an inventory of your setup. This will come in handy when deciding on the Exchange version and the changes you need to do. Things to collect are:
Active Directory (AD) Forest and Domain Level
Active Directory Servers Operating system
If hosted on virtual environment, o Operating system level support o Storage availability o Other resources availability like RAM and cores
Storage being used currently with number of mailboxes and their respective size
Other resources which could be migrated like public folders etc.
Other software interacting with Exchange Server like Lync, etc.,to see the compatibility with Exchange Server 2019
Step 3: Coexistence
The most important thing to consider is the coexistence of Exchange Server 2010 with the 2019 version. The two cannot coexist in the same AD schema. So, what is the way forward? You need to first migrate to Exchange Serve 2013 or 2016, decommission the Exchange Server 2010, do the required infrastructure changes, and then migrate to Exchange Server 2019. This is the official move to take as there are a lot of internal changes required to move from 2010 and 2019.Therefore,it would be impossible for these two to coexist.
When you purchase the licenses, make sure that these come with backward versions availability for this process. When you consider about software, you must also look for the supported operating system. For Exchange Server 2019, you need to have Windows Server 2019 Standard or Datacenter. For Exchange Server 2019 license, you need to consider Standard or Enterprise edition, depending on the number of users and other features such as,
In-Place Archive
In-Place Hold
Multi-Mailbox search
Information Protection and Control
Step 4: Active Directory
If you are running Exchange Server 2010 using Windows Server 2008 R2, you might also consider upgrading it as Exchange Server 2019 is not compatible with the domain/forest level of Windows Server 2008 R2. For migrating to Exchange Server 2019, you must first upgrade your Active Directory servers to a minimum of Windows Server 2012 R2,including domain and forest level.
Step 5: DNS Namespaces
Exchange 2019 supports the following DNS namespaces:
Contiguous
Non Contiguous
Single label domains
Disjoint
Step 6: Management Tools
To install Exchange Server 2019 Management Tools, you must have the following Windows operating systems:
Windows Server 2019 Standard or Datacenter
Windows 10 (64-bit edition only)
Step 7: Hardware Requirements
A temporary server must be used to install Exchange Server 2013 and then move to the new server hosting Exchange 2019. In a virtual environment, this should not be a problem as the machine would be commissioned and decommissioned easily. But if you have a physical server with no virtual hypervisors, you need to consider either purchasing or renting a server for the hop installation.
For Exchange Server 2019 setup, the minimum requirements totally depend on the setup and volume of the mailboxes.
However, it is recommended that for a setup of 50 users you should have minimum 4 cores with 32GB RAM and have about 25% storage allocated for the paging file.
With regards to size on storage, usually as a best practice, you would have a separate drive setup so it would be easy to manage.
100GB for the operating system
50GB for the Exchange installation
100GB for the mailbox storage
20GB for the paging file
Please note that the above storage allocations are to be taken as indicative.The storage must be set depending on the current data that the setup has.
Step 8: User Applications: Microsoft Office
The Exchange Server 2019 supports only the below Office versions:
Office 365 Apps bought online with software assurance
Outlook 2019
Outlook 2016
Outlook 2013
Outlook 2016 for Mac
If you’re still running Windows 7, it is recommended to migrate to Windows 10.For running Windows 7, the KB3140245 must be applied to enable TLS1.1 and TLS1.2 support, otherwise, you will not be able to connect to the mailbox. Of course, this doesn’t imply any restrictions, if the users work using the web version.
For mobile device, users using their own device or the company’s mobile or tablet, it is important and highly recommended not to use native application to connect to the mailbox. It’s important to install Microsoft Outlook from Google Play Store or Apple App Store to ensure compatibility.
Step 9: Migration Process
As discussed above, Exchange 2010 and 2019 cannot coexist. Therefore, various works on the infrastructure and Active Directory Domain must be carried out before installing the Exchange Server 2019.In addition, you need to consider the hardware as you need to hop install the setup. The downtime, administrative effort, and cost of these resources must also be taken in consideration.
The process involves installation of Exchange Server 2013, performing a mailbox move from Exchange 2010 to Exchange 2013 including checking domain accounts, URLs, connectors, Active Directory changes, network changes to route email to the new server, certificates and roles, before decommissioning the Exchange 2010. Once the decommission process is done, you have to restart the process again to migrate to Exchange Server 2019. You need to make sure that the Active Directory migration and upgrade is complete and working, before starting the Exchange Server 2019 process, and eliminate the old Domain controllers.
If all goes well, the migration of the mailboxes would go smooth. You will not face any problem, apart from some hassles such as lot of administrative effort, resources and installations required to hop install to Exchange 2019.However, things may go wrong since it doesn’t involve just Exchange process but also changes in infrastructure, network, etc. To avoid hassles and other issues, use Stellar Converter for EDB that can ease the process of migrating mailboxes from Exchange 2010 to Exchange 2019.
Decommission the Exchange Server 2010, migrate the Active Directory Server to Windows Server 2012 R2 or 2019, and then install Exchange Server 2019. After this stage, open Stellar Converter for EDB and export all mailboxes directly to the new live Exchange Server 2019 database, with no hassle and no extra configuration. This will ensure a smooth migration with no complications or hop installations.
In today’s guide we will cover how to install Drupal 9 CMS on CentOS 8 Linux system. Drupal is an open source content management system that enables content creators to build amazing digital experience. With Drupal it becomes easy to create a new website and add, edit, publish, or remove content all on a web browser. The Drupal software is written in PHP and distributed under the GNU General Public License.
Most of the features of Drupal 9 came from the improvements of Drupal 8 and new additional features. Some features of Drupal CMS are:
Layout Builder: Allows content editors to design pages without engineering help
API-first architecture: Enables building robust decoupled and headless applications
Media Library: Makes the management of images, video, and other assets easier than ever before.
Automated updates
New admin interface and default theme
How To Install Drupal 9 CMS on CentOS 8
Before you start the installation of Drupal 9 CMS on CentOS 8 take note of below new requirements.
PHP >=7.3
MySQL or Percona, version >=5.7.8
MariaDB >=10.3.7
PostgreSQL >=10
If you follow below steps keenly you should have a working Drupal 9 CMS installed on your CentOS 8 server.
Step 1: Update System
Ensure your system is updated to the latest release:
sudo dnf -y update && sudo systemctl reboot
Once the server has come up login again and confirm updates were applied.
$ ssh username@serverip
Step 2: Install MariaDB database on CentOS 8
There are many databases that can be used by Drupal. My database of choice is MariaDB.
Run these commands to install MariaDB database server on CentOS 8 Linux.
sudo dnf -y install @mariadb
Start and enable the service after installation.
sudo systemctl enable --now mariadb
Confirm the service is in running state:
$ systemctl status mariadb
● mariadb.service - MariaDB 10.3 database server
   Loaded: loaded (/usr/lib/systemd/system/mariadb.service; enabled; vendor preset: disabled)
   Active: active (running) since Sat 2020-06-27 00:59:27 CEST; 33s ago
     Docs: man:mysqld(8)
           https://mariadb.com/kb/en/library/systemd/
  Process: 3945 ExecStartPost=/usr/libexec/mysql-check-upgrade (code=exited, status=0/SUCCESS)
  Process: 3811 ExecStartPre=/usr/libexec/mysql-prepare-db-dir mariadb.service (code=exited, status=0/SUCCESS)
  Process: 3786 ExecStartPre=/usr/libexec/mysql-check-socket (code=exited, status=0/SUCCESS)
 Main PID: 3913 (mysqld)
   Status: "Taking your SQL requests now..."
    Tasks: 30 (limit: 24403)
   Memory: 85.3M
   CGroup: /system.slice/mariadb.service
           └─3913 /usr/libexec/mysqld --basedir=/usr
......
Secure your database server by setting root password, disabling root remote logins and removing test databases that we don’t need.
$ sudo mysql_secure_installation

NOTE: RUNNING ALL PARTS OF THIS SCRIPT IS RECOMMENDED FOR ALL MariaDB
      SERVERS IN PRODUCTION USE!  PLEASE READ EACH STEP CAREFULLY!

In order to log into MariaDB to secure it, we'll need the current
password for the root user.  If you've just installed MariaDB, and
you haven't set the root password yet, the password will be blank,
so you should just press enter here.

Enter current password for root (enter for none):
OK, successfully used password, moving on...

Setting the root password ensures that nobody can log into the MariaDB
root user without the proper authorisation.

Set root password? [Y/n] y
New password:
Re-enter new password:
Password updated successfully!
Reloading privilege tables..
 ... Success!


By default, a MariaDB installation has an anonymous user, allowing anyone
to log into MariaDB without having to have a user account created for
them.  This is intended only for testing, and to make the installation
go a bit smoother.  You should remove them before moving into a
production environment.

Remove anonymous users? [Y/n] y
 ... Success!

Normally, root should only be allowed to connect from 'localhost'.  This
ensures that someone cannot guess at the root password from the network.

Disallow root login remotely? [Y/n] y
 ... Success!

By default, MariaDB comes with a database named 'test' that anyone can
access.  This is also intended only for testing, and should be removed
before moving into a production environment.

Remove test database and access to it? [Y/n] y
 - Dropping test database...
 ... Success!
 - Removing privileges on test database...
 ... Success!

Reloading the privilege tables will ensure that all changes made so far
will take effect immediately.

Reload privilege tables now? [Y/n] y
 ... Success!

Cleaning up...

All done!  If you've completed all of the above steps, your MariaDB
installation should now be secure.

Thanks for using MariaDB!
Test that you can login to database as root user with password set
$ mysql -u root -p
Enter password:
Welcome to the MariaDB monitor.  Commands end with ; or \g.
Your MariaDB connection id is 16
Server version: 10.3.17-MariaDB MariaDB Server

Copyright (c) 2000, 2018, Oracle, MariaDB Corporation Ab and others.

Type 'help;' or '\h' for help. Type '\c' to clear the current input statement.

MariaDB [(none)]>
Step 3: Create Drupal Database
A database and user is required by Drupal CMS to be functional. Open MariaDB shell.
$ mysql -u root -p
Create database and user for Drupal.
CREATE DATABASE drupal;
GRANT ALL ON drupal.* TO 'drupal'@'localhost' IDENTIFIED BY 'Str0ngDrupaLP@SS';
FLUSH PRIVILEGES;
\q
Nakon uspješno dodanog NFS ver. 3 storage-a na sve hostove, datastore-i su vidljivi, no na njima nije moguće kreiranje virtualnih računala.
O:
-Da li na datastore-u ima dovoljno prostora (Zapunjen)
-Da li su NFS dozvole ispravno konfigurirane (Read-Only)
-Da li se VM može kreirati na nekom drugom Datastore-u (Izoliran problem na jednom hostu)
-Da li postoji manje od 32000 file-ova na problematičnom datastore-u (Ograničenje NFS-a)
-Da li je block size ispravno podešen (Ograničenje veličine file-a)
Prilikom dodavanja novog ESXi servera u infrastrukturu uočeno je da na iSCSI LUNovi nisu vidljivi nakon što su podešene postavke za software-ski iSCSI target.
O:
-Da li su mrežne postavke ispravno podešene (IP, maska, port 3260)
-Da li HBA može pristupiti storage-u (ping, vidljivost)
-Da li postoji firewall koji blokira pristup storage-u (Windows Firewall, iptables, firewalld)
-Da li je podržana komunikacija storage-a i HBA-a (supported configuration)
-Da li je napravljen rescan Storage Devices-a (trenutno nije vidljiv)
-Da li ostali hostovi vide sporne Datastore-ove
Prema informacijama dobivenim od korisnika primjećen je pad performansi virtualnih računala vezano za pristup disku. Problem se pojavljuje nakon što je na lokaciju isporučen novi ESXi server kojeg je prethodno pripremio pripravnik u ICT podršci na osnovupostojeće dokumentacije. I ESXi serveri i iSCSI target imaju po dvije IP adrese za iSCSI komunikaciju.
O:
-Da li je instaliran zadnji dostupan driver i firmware
-Da li je latencija prema storage-u prevelika (da li odstupa više od BP-a)
-Da li su procesor ili memorija slobodni
-Da li je problem uopće vezan uz dodavanje novog hosta (Možda je storage krenuo u rebuild RAID polja što se poklopilo točno sa dodavanjem servera)
-Da li se problem manifestira sa svim hostovima (Da li je problem samo sa novim hostom)
-Da li je stvarno sporost ili normalan rad sustava
Nakon zamjene hardwerske FC kartice na jednom od poslužitelja nije više moguće pristupiti dijeljenim datastoreima.
O:
-Da li je instaliran zadnji dostupan driver i firmware
-Da li napravljen rescan datastore-a
-Da li ostali hostove vide datastore
-Da li je promijenjen stari WWN u novi na ACL-ovima i Initiator postavkama
-Da li je zoniranje ispravno odrađeno
-Da li FC switch šalje RSCN poruke
-Da li je FC kartica ispravna
Nakon normalnog korištenja datastore-a na NFS v4.1 serveru, datastore-i više nisu dostupni za korištenje.
Prema informacijama nitko ništa nije mijenjao tijekom zadnjih mjesec dana na opremi.
O:
-Da li su datastore-ovi mountani
-Da li su datastore-ovi vidljivi na FC infrastrukturi
-Da li je storage živ
-Da li po logovima stvarno nije ništa dirano
Nakon normalnog korištenja datastore-a na NFS-u, pojavljuju se korumpirane virtualna računala na datastoru, te ih se mora vraćati iz arhive da bi sustav oporavili. Prema informacijama u sustav je dodano par novih ESXi servera koji su se također spojili na taj NFS.
O:
-Na koji način se korupcija manifestira (OS ili Hypervisor level)
-Da li file-ovi na datastore-u imaju postavljen lock
-Da li postoje već snimljeni i dokumentirani problemi koji se pojavljuju i nama na online zajednicama
-Da li postoje problemi hardverske prirode koji bi uzrokovali ovakav kvar (storage level)
Od zadnje rekonfiguracije i radova na sustavu i mreži prošlo je dva tjedna. Danas, nakon kvara baterija na UPS-u i ponovnog pokretanja, pristup iSCSI storage-u više ne radi samo s nekih ESXi servera.
O:
-Što se točno rekonfiguriralo i kako (change management)
-Da li je konfiguracija ostala spremljena na mrežnoj opremi (prilikom gašenja se resetirala na staro)
-Da li je uslijed nestanka struje došlo do kvara na hardveru
Zbog višestrukih prijava na helpdesk za slabe performanse rada s diskovima sumnja se na probleme s storage sustavom. Problemima su zahvaćene samo neka virtualna računala. Svi ESXi serveri imaju pristup do svih datastora.
O:
-Da li su svi problematični VM-ovi na istom datastore-u
-Da li su svi problematični datastore-ovi sa istog LUN-a na storage-u
-Da li je ispad diska uzrokovao slabije performanse zbog rebuilda RAID polja
-Da li su svi path-ovi do storage-a online
-Da li je ispravna mrežnom (FC) opremom
Najavljeni su radovi zbog kojih je potrebno jedan od 32 ESXi servera privremeno onemogućiti unutar HA clustera. Slobodnih resura ima dovoljno za failover, te je server uspješno ugašen za radove. No nakon nenadanog kvara drugog ESXi servera, dio virtualnih računala nije ponovo pokrenut. ESXi serveri imaju pristup do različitih vrsta datastora.
O:
-Da li hostovi imaju pristup do datastore-ova na kojima su problematične virtualke
-Da li je na virtualkama konfiguriran HA
-Da li su virtualne mašine članovi neke host affinity grupe
Najavljeni su radovi zbog kojih je potrebno preseliti dio virtualnih računala na živo s nekoliko servera na neke druge ESXi server. Do danas se nije koristila funkcionalnost vMotiona. Prilikom pokušaja selidba migracije nije uspjela.
O:
-Da li su ispravne mrežne postavke
-Da li je vMotion omogućen na predviđenim portovima za to
-Da li je mreža dovoljno brza za odradu vMotion-a
-Da li se hostovi vide na mreži
-Da li postoji dovoljno resursa na drugom hostu za prihvat virtualki
    #### WLC ####

WLC ip 192.168.1.1 255.255.255.0
 default router 192.168.1.254
 dhcp server 192.168.1.254

    #### ROUTER ####

ip dhcp pool IT
 network 192.168.1.0 255.255.255.0
 default-router 192.168.1.254
 dns-server 8.8.8.8
!
ip dhcp pool AP
 network 192.168.10.0 255.255.255.0
 default-router 192.168.10.254
 dns-server 8.8.8.8
!
ip dhcp pool Guest
 network 192.168.30.0 255.255.254.0
 default-router 192.168.30.254
 dns-server 8.8.8.8
!
!
ip forward-protocol udp 5246
!
interface FastEthernet0/0.1
 description IT
 encapsulation dot1Q 1 native
 ip address 192.168.1.254 255.255.255.0
 ip nat inside
 ip virtual-reassembly in
!
interface FastEthernet0/0.10
 description AP
 encapsulation dot1Q 10
 ip address 192.168.10.254 255.255.255.0
 ip nat inside
 ip helper-address 192.168.1.1
 ip virtual-reassembly in
!
interface FastEthernet0/0.30
 description Guest
 encapsulation dot1Q 30
 ip address 192.168.30.254 255.255.254.0
 ip access-group GUEST in
 ip nat inside
 ip virtual-reassembly in
!
interface FastEthernet0/1
 ip address 10.10.2.151 255.255.255.0
 ip nat outside
 ip virtual-reassembly in
 duplex auto
 speed auto
!
ip nat inside source list WIFI interface FastEthernet0/1 overload ( pazi na interface)
ip route 0.0.0.0 0.0.0.0 10.10.2.254 (ovo je adresa od profesora)
!

OVO MOZDA NECE TREBATI
ip access-list extended GUEST
 deny   ip 192.168.30.0 0.0.1.255 192.168.1.0 0.0.0.255
 deny   ip 192.168.30.0 0.0.1.255 192.168.10.0 0.0.0.255
 permit  ip any any

ip access-list extended WIFI
 permit ip 192.168.1.0 0.0.0.255 any
 permit ip 192.168.10.0 0.0.0.255 any
 permit ip 192.168.30.0 0.0.1.255 any
!


    #### SWITCH ####

interface FastEthernet1/0/1
 description ROUTER
 switchport trunk encapsulation dot1q
 switchport trunk allowed vlan 1,10,30
 switchport mode trunk
!
interface FastEthernet1/0/2
 description WLC
 switchport trunk encapsulation dot1q
 switchport trunk allowed vlan 1,10,30
 switchport mode trunk
!
interface FastEthernet1/0/3
 description AP
 switchport access vlan 10
 switchport mode access

interface FastEthernet1/0/4
 tu stavi PC (bit ce default vlan 1)
!
1. DIO – CLI
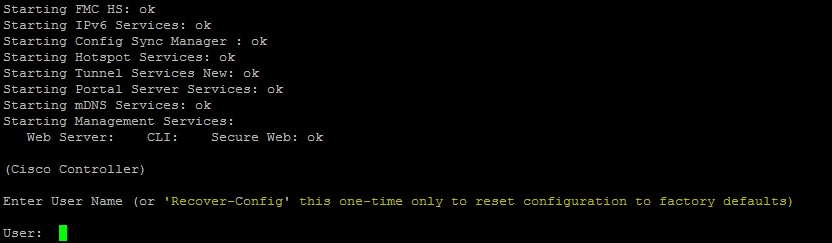
WLC-u ne možemo odmah pristupiti kroz browser već je potrebno prvo kroz CLI vratiti ga na tvorničke postavke i proći kroz postupak autoinstalacije!
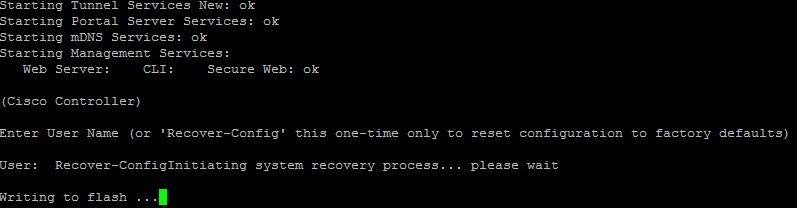
1. Reboot-ati WLC da se pojavi odzivnik sa “Recover-Config”
2. Pod User: upišemo Recover-Config ….. nakon toga započinje system recovery process
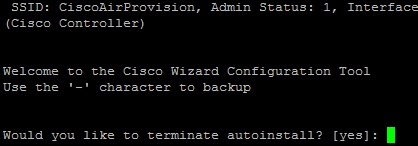
3. Kada se WLC bootao sa tvorničkim postavkama pita nas da li želimo autoinstall, kažemo yes…
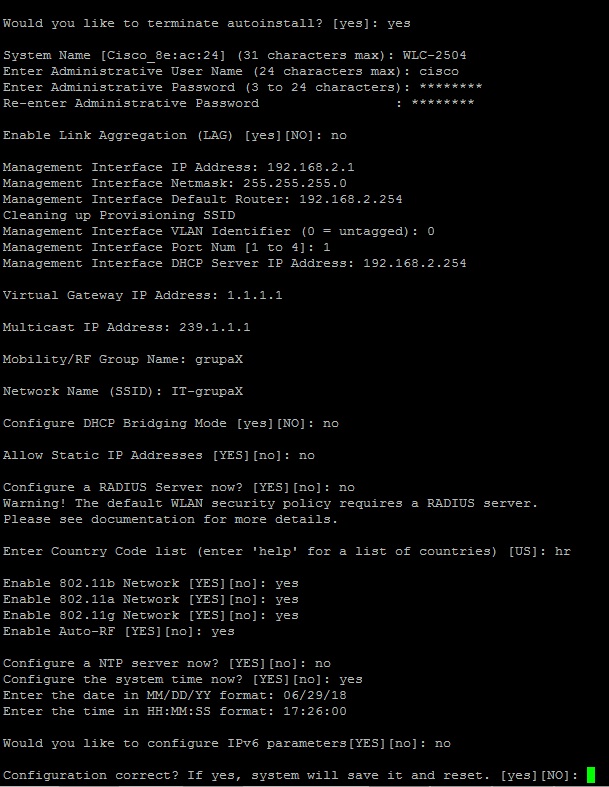
4. U procesu autoinstalacije moramo odraditi postavke koje nas WLC traži a koje su mu nužno potrebne za operativni rad…
*Važna napomena – management ip adresu postavljate neku svoju (preko nje se spajate kroz browser na wlc a isto tako nju wlc koristi za uspostavu capwap tunela s AP-om).
DHCP je adresa koju postavite na routeru I neka bude ista kao I default router!
Ostalo sve možete postaviti identično kao što je u ovom primjeru!
5. Nakon što ste odradili autoinstalacijski proces i možete se ulogirati sa admin userom kojeg ste postavili, potrebno je aktivirati SSC i MIC certifikate na WLC-u koji su nužni za enkripciju (DTLS) control message-a koje se razmjenjuju između WLC-a i AP-a:
(WLC)> Config ap lifetime-check mic enable
(WLC)> Config ap lifetime-check ssc enable
2. DIO
Gotovi smo sa CLI-om i sada konačno možemo pristupiti kroz web browser.
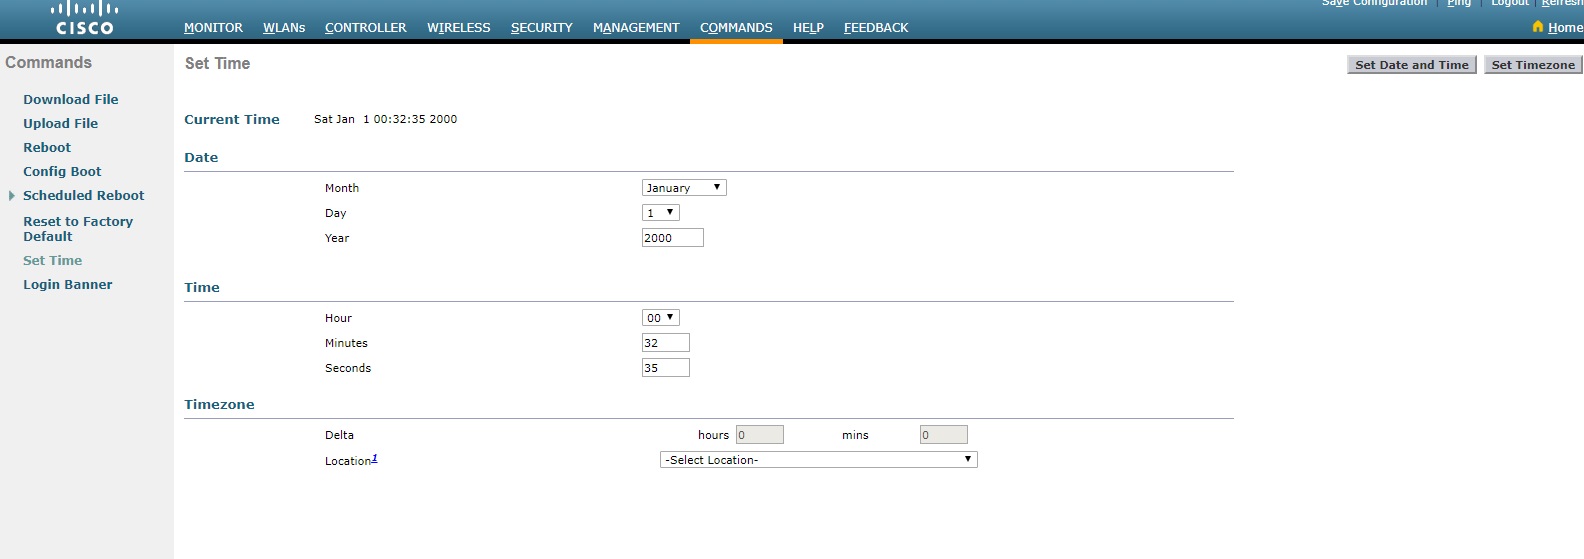
1. Moramo postaviti time-zonu i provjeriti da li nam je dobro postavljen sat
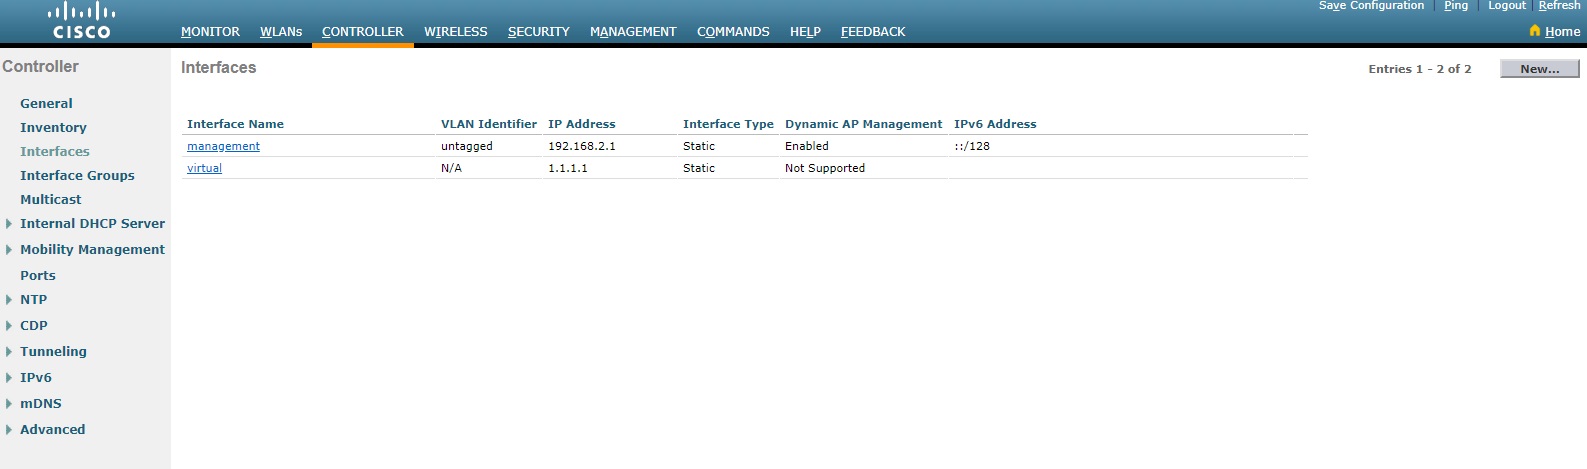
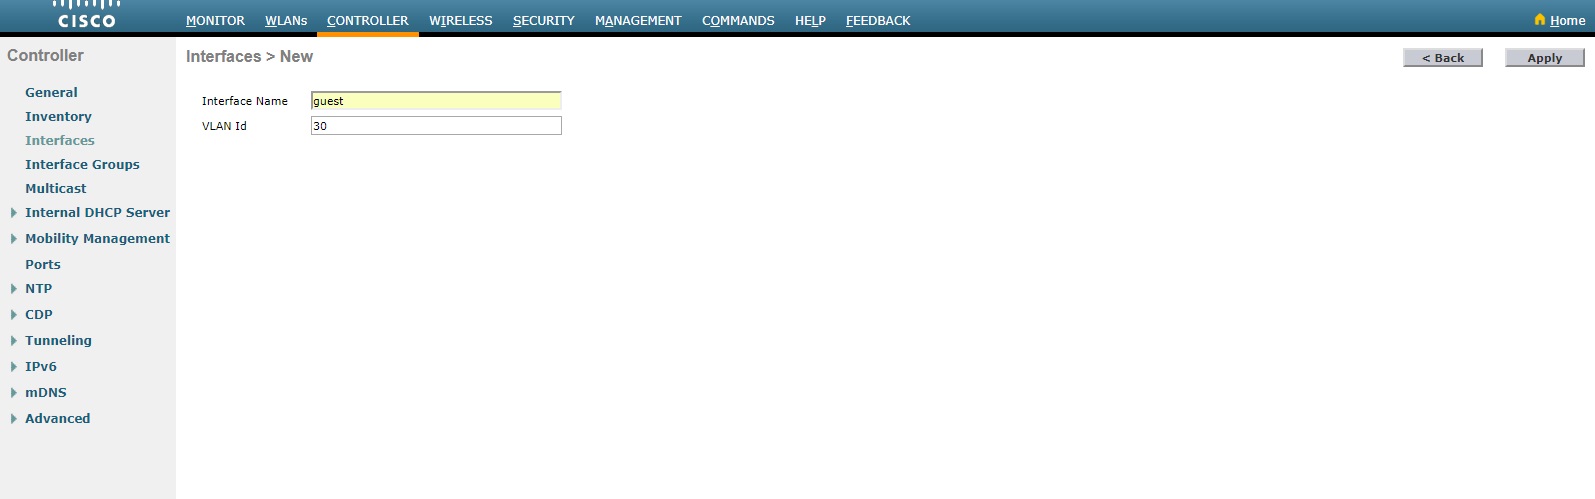
2. Sad možemo krenuti u instalaciju WLAN-a za Goste, prvo moramo postaviti novi dinamički interfejs:
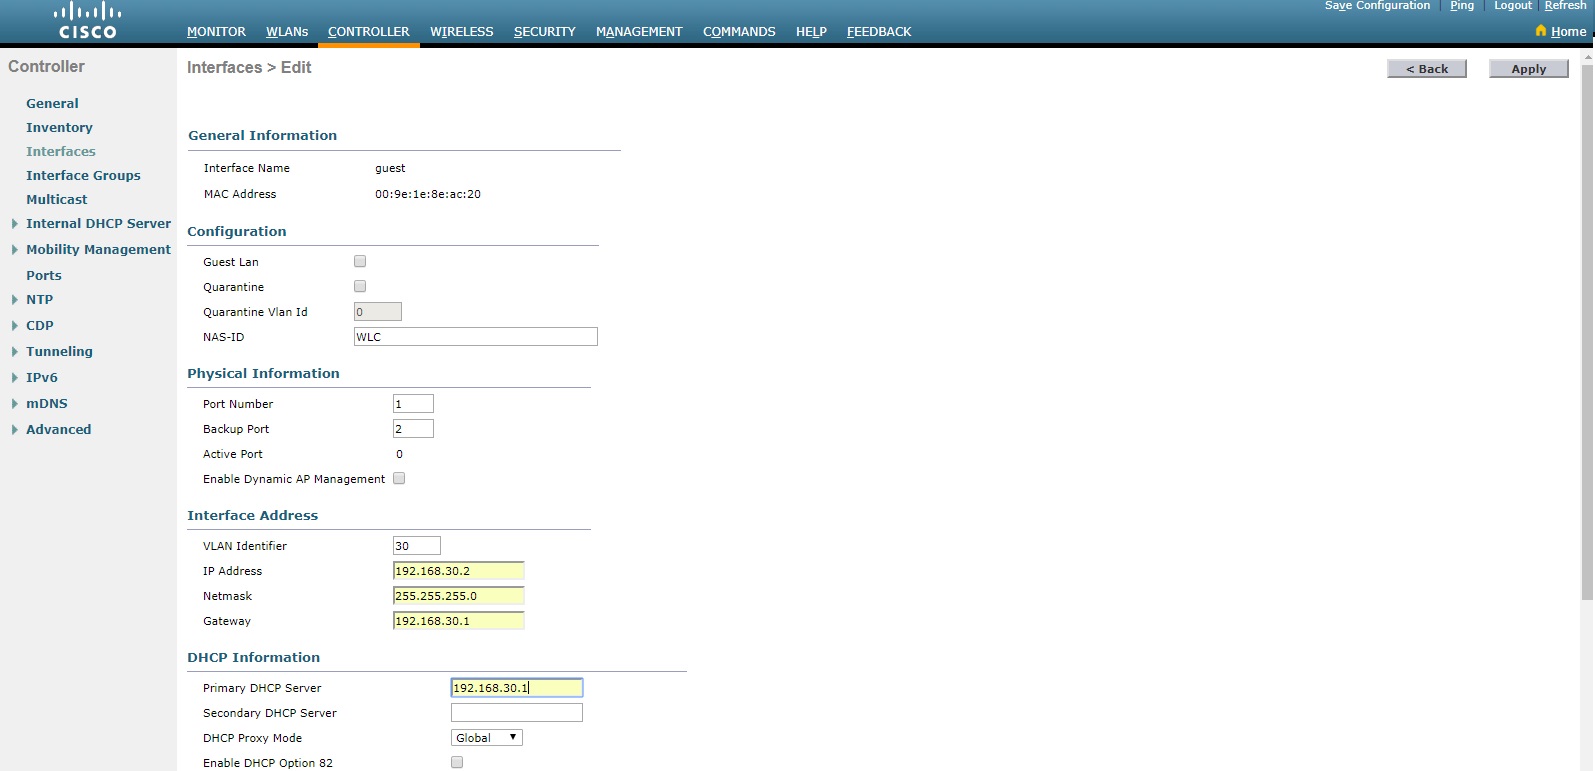
3. Pod naš novi interfejs “guest” postavimo ip adresu i ostale parametre koji će se odnostiti na mrežu za goste, npr. ja sam stavio 192.168.30.0/24 mrežu za goste
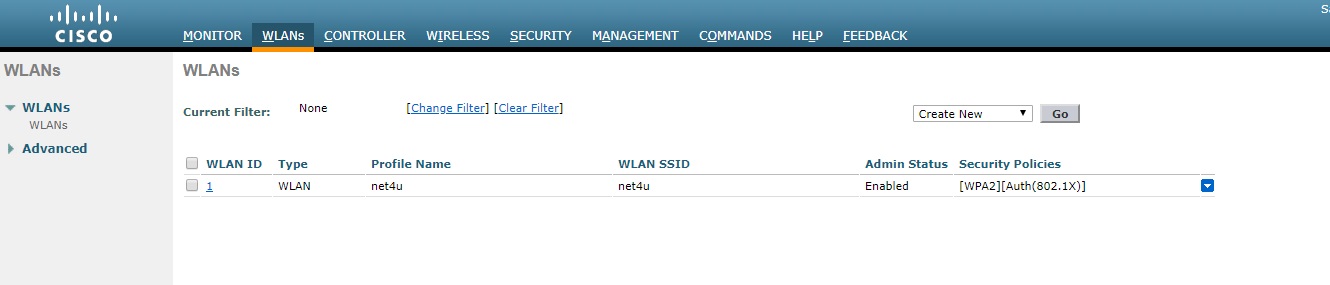
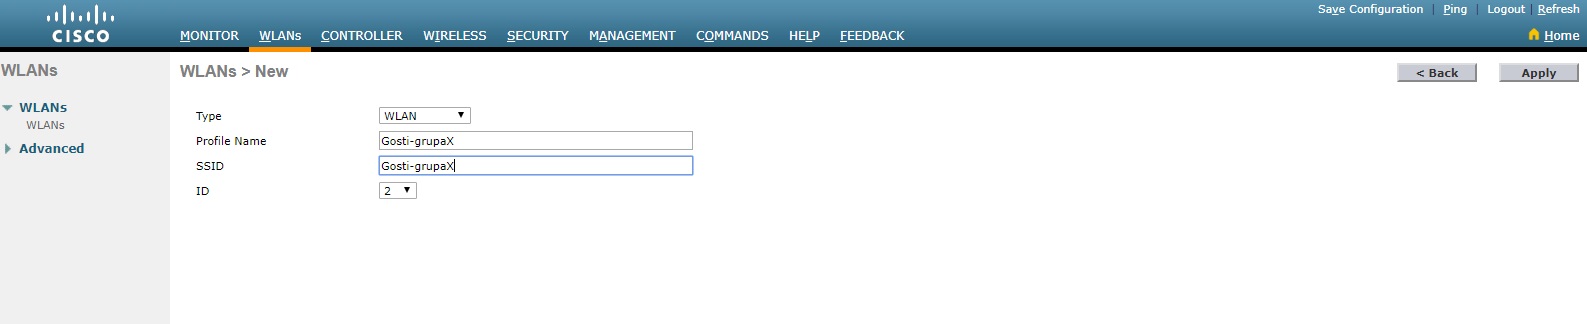
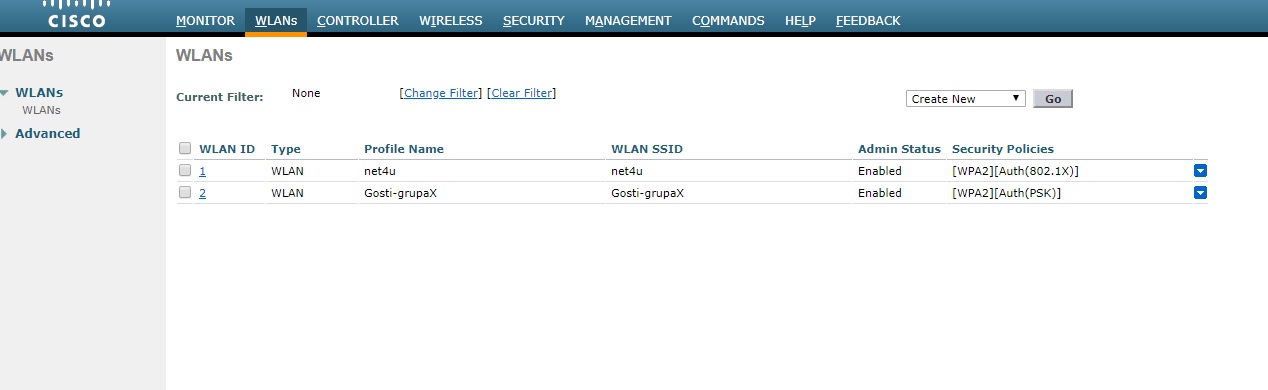
4. Sada treba postaviti WLAN za goste…pritisnemo „create new“ i go
odaberemo naziv ssid-a- ja ću vam na samom ispitu reći koje ćete nazive staviti
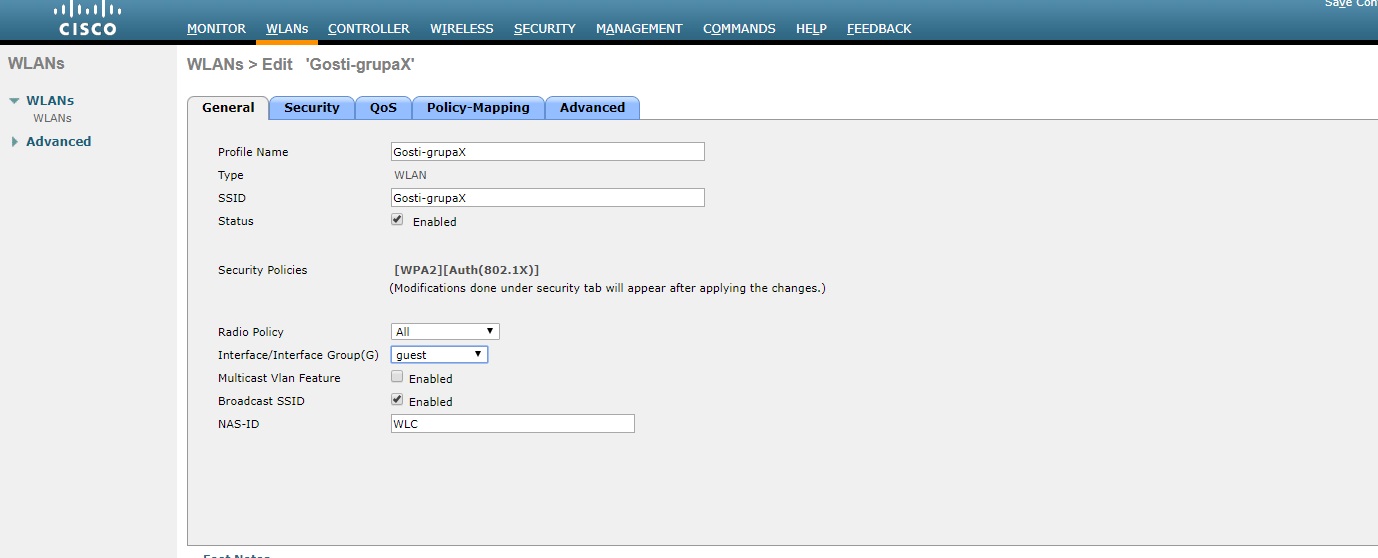
Da bi nam WLAN bio aktivan moramo označiti status „enabled“ i pod interfejs odabrati guest kojeg smo malo prije kreirali…
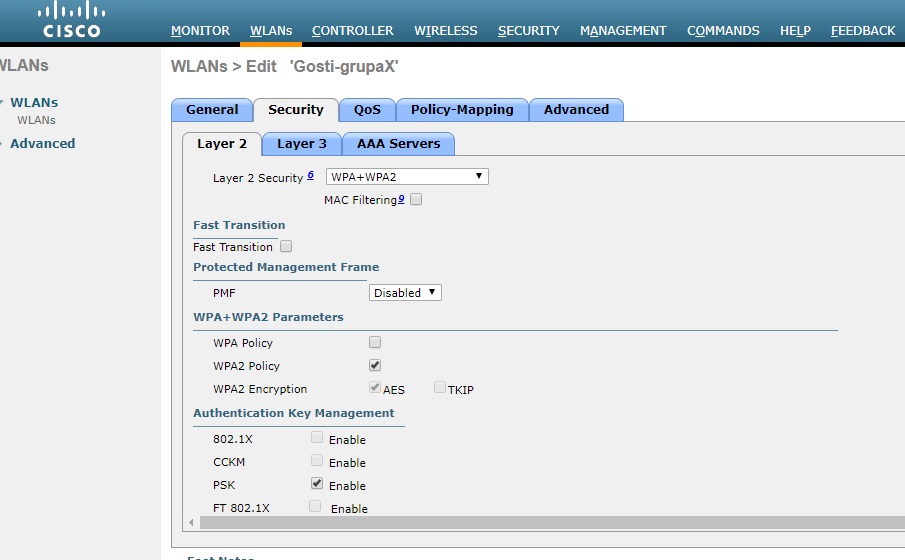
Sada kreiramo sigurnosne parametre za naše SSID-eve, npr. za IT ćemo staviti WPA+WPA2 i PSK-a malo kompleksniji password
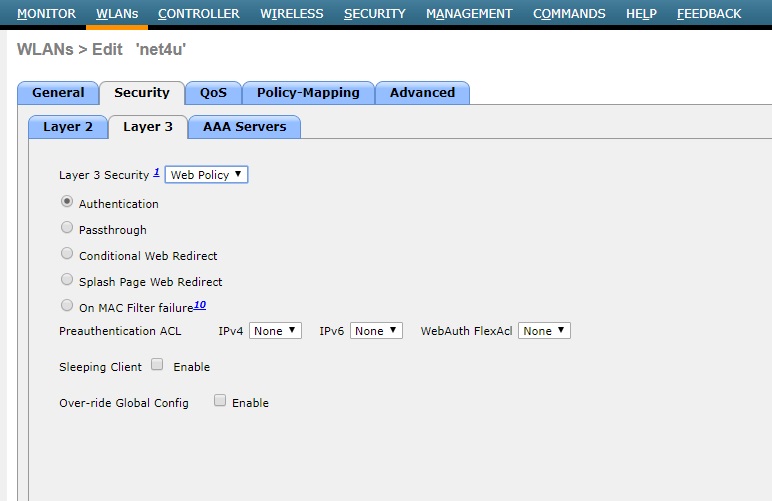
A za goste ćemo napraviti web autentikaciju…
to se radi u dva koraka:pod L2 sec stavimo “none” a pod L3 sec odaberemo web authentication
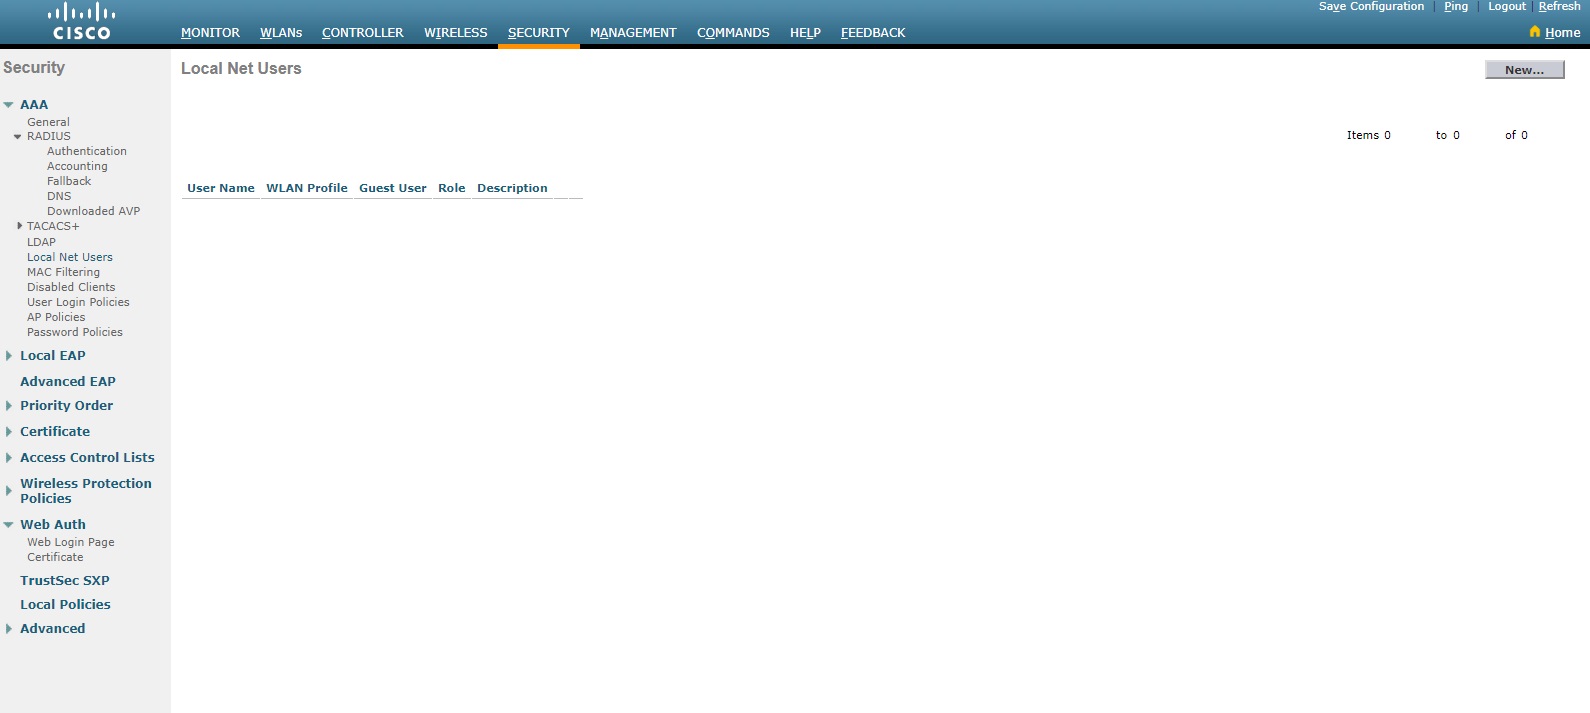
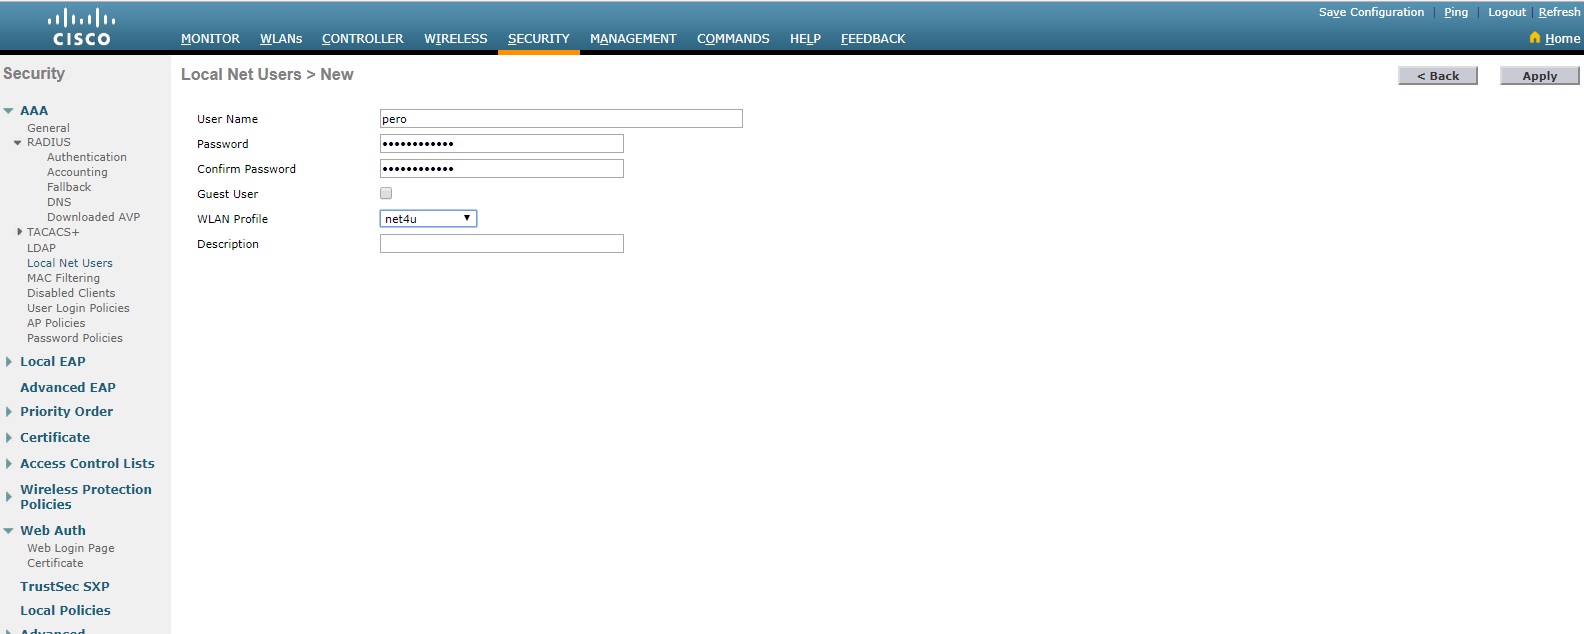
Da bi mogli isprobati web-autentikaciju moramo kreirati nekog gost usera – tab security, local net user
ja sam proizvoljno usera nazvao Pero i odredio da će se on autenticirati samo na SSID net4u, vi ćete tu staviti naravno ssid za goste…
WIFI Troubleshooting
S obzirom da ste svi na vježbama imali problema s povezivanjem AP-a i WLC-a kada su bili u različitim subnetima, a da se nitko osim Filipa Domislovića nije potrudio napraviti bilo kakav suvisli troubleshooting (već ste samo zaključili da to ne radi, a to nije inženjerski pristup!!!), ovdje vam izlažem i taj dio kako ne bi svi popadali na ispitu:
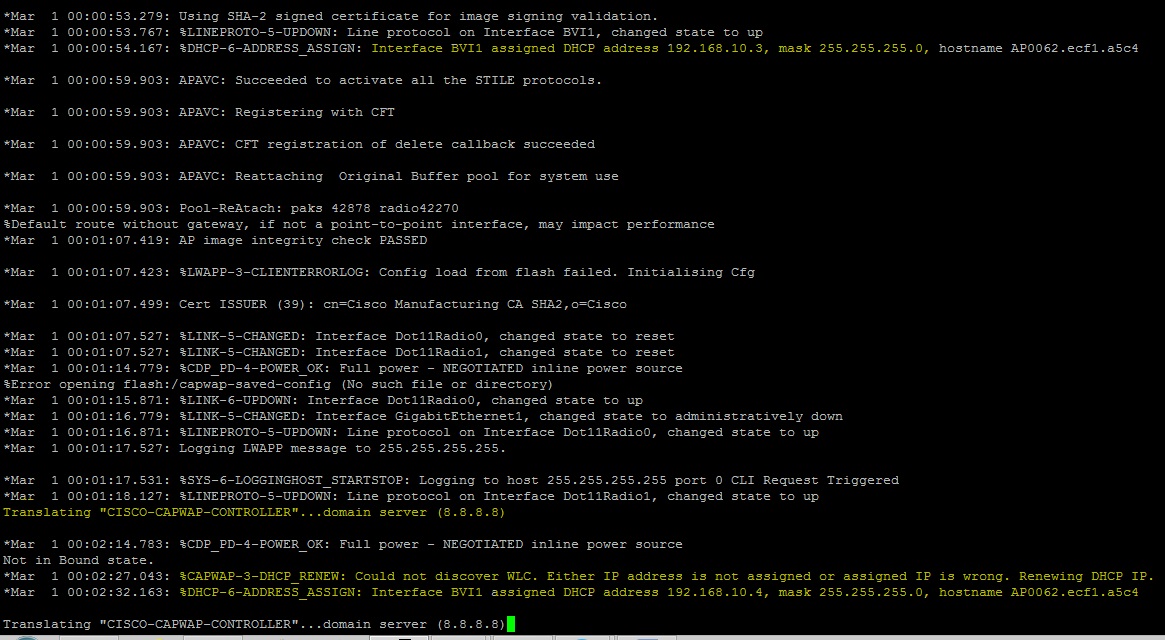
1. Debug s AP-a:
Žuto sam vam označio najbitnije iz debug-a
– Prvo možete vidjeti da AP dobije od DHCP-a (koji je na routeru) ip adresu iz pool-a za AP, ja sam stavio da je to mreža 192.168.10.0/24
– Nakon toga vidite drugo što sam označio sa žutim, AP pokušava pronaći WLC da uspostave CAPWAP. I tu dolazimo do ključne stvari na kojoj ste svi osim Filipa pali!
– AP ima svoj algoritam koji provodi čak 5 koraka u pokušaju pronalaska WLC-a:
– Ako su na istom segmetu (dakle isti vlan) onda će se pronaći bez problema tako što će AP poslati broadcast upit tražeći da mu se javi WLC i ovaj će mu odgovoriti s unicast porukom i uspostavit će tunel
– Ako se nalaze u različitim segmentima onda se AP i WLC ne mogu pronaći na taj način kroz broadcast poruke, nego AP mora imati ili statički definiranu adresu WLC-a, ili mora koristiti u DHCP serveru option 42, ili mora na routeru biti podignut dns server da AP može resolvati po imenu ili možete najjednostavnije napraviti DHCP relay kako bi prosliedili broadcast upit u drugu mrežu prema WLC-u.
– Ako ništa od navedenog niste napravili na vašem routeru onda imate problem kojeg ste svi imali na vježbama da AP ne može pronaći WLC….a evo sada i slike da vidite sve ovo napisano:
Kao što vidite ako ste u dhcp pool za AP postavili dns 8.8.8.8 onda će vaš AP preko google dns-a pokušati resolvati WLC po nazivu „CISCO-CAPWAP-CONTROLLER“ i to naravno neće proći….
Nakon toga AP javlja da nije mogao pronaći WLC i šalje dhcp-u zhtjev za novom ip adresom kako bi ponovo pokušao pronaći WLC, vidite da je moj AP sada dobio novu adresu 192.168.10.4 (gore je imao 192.168.10.3) i tako to ide u nedogled…to je odgovor vama koji ste me na vježbama pitali zašto AP svaku minutu dobije novu ip adresu…sad znate i taj odgovor
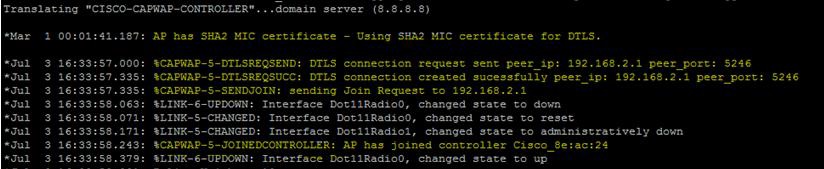
Ovaj „problem“ možete riješiti na 4 različita načina kako sam vam gore napisao, a najjednostavniji je da postavite dhcp relay na routeru za što vam trebaju dvije komande:
Router (config-if)#interface f0/0.10
ip helper-address 192.168.2.1
S ovom naredbom ste omogućili da virtualni interfejs (gtw od AP-a) prosljeđuje broadcast upite AP-a točno prema adresi WLC-a (192.168.2.1 je u mom primjeru adresa WLC-a, vi ćete tu staviti ip adresu vašeg WLC-a tj. management interface-a na WLC-u)
Router (config)#ip forward-protocol udp 5246
S ovom naredbom ste eksplicitno omogućili routeru da prosljeđuje udp pakete po portu 5246 što je port CAPWAP tunela.
I to je to…..sada će AP bez problema pronaći WLC jer će njegov upit stići do WLC-a i dobit će odgovor te će podići capwap tunnel….evo i slike za taj dio žuto
AKO STE SVE OVO USPJEŠNO NAPRAVILI UPRAVO STE PROŠLI ISHOD 3….A SAD SLIJEDI
ISHOD 4
Važna napomena – bez uspješno riješenog Ishoda 3 nije moguće položiti Ishod 4 jer se jedno na drugo nadovezuje!!!
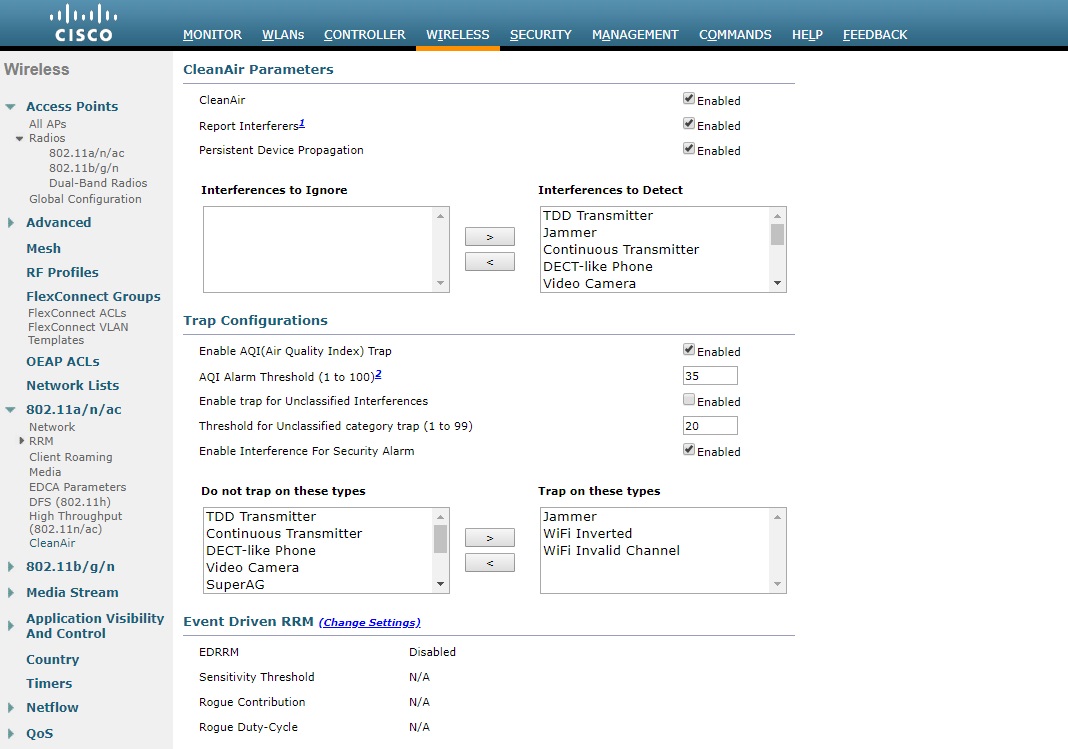
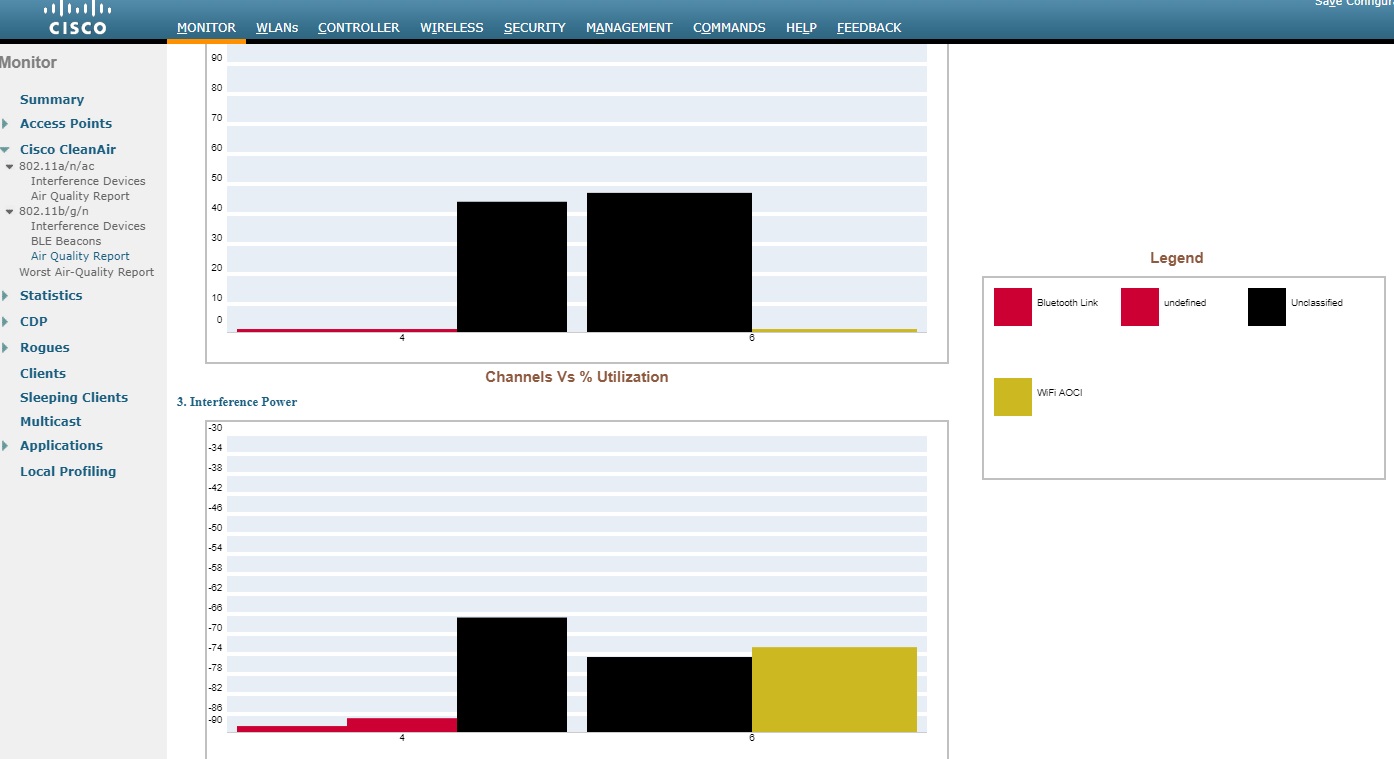
1. Cisco Clean Air
Potrebno je konfigurirati ovaj feature pomoću kojeg će WLC izraditi report o interferenciji a vi ćete na ispitu odgovoriti na neka pitanja koja ćete iščitati iz tog report-a:
Konfiguracija je jednostavna, pod tabom – wireless – u lijevom kutu 802.11 b/g/n (a/n/ac ne trebate za ispit) – odaberete cisco clean air
Označite sve kvačice da enablate stavke i ubacite sve parametre za detekciju interferencije
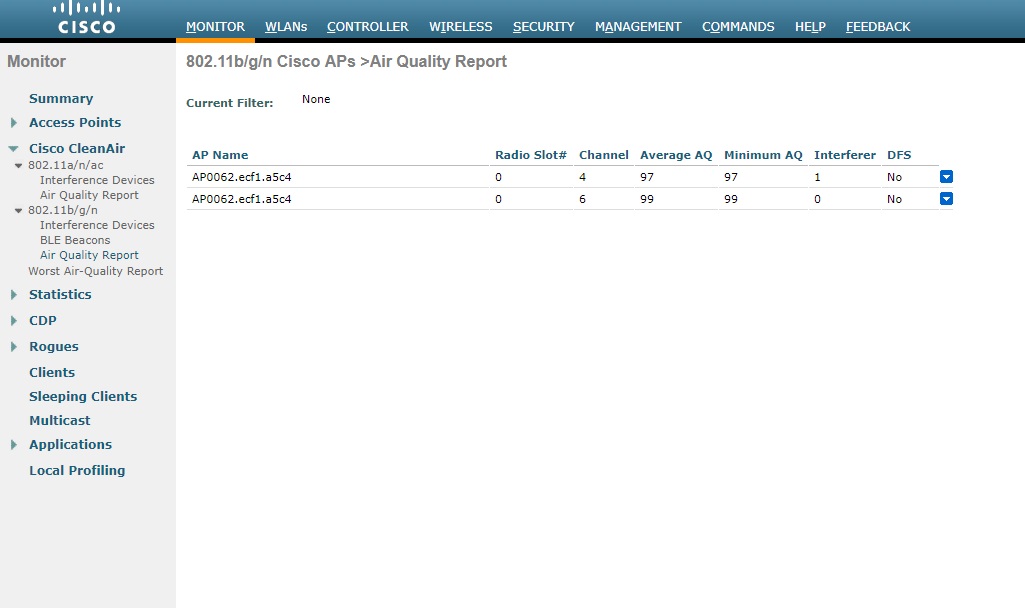
Ovako izgleda u monitoring sustavu nakon što se konfa clean air (treba mu malo vremena da pokaže prva izvješća, tako da odgovarajte na druga pitanja dok se za cca 5 min ne pokaže prvo izvješće)!
Ovako izgleda sam graf nakon što odaberete izvještaj kojeg želite pogledati
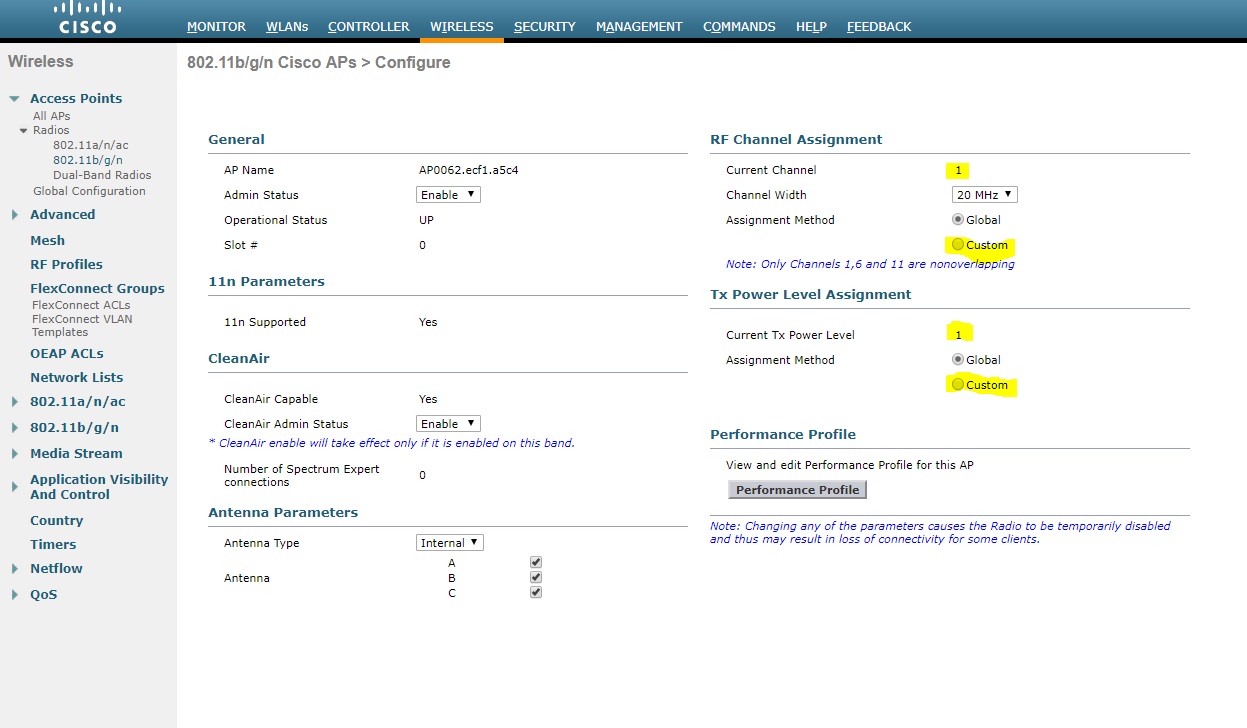
2. Slijedi drugi dio testa sa pitanjima gdje trebate mijenjati kanal i snagu emitiranja signala te usporediti neke vrijednosti…
Ovako se ručno ulazi u konfiguraciju AP kroz wlc i postavljaju custom parameti, kada se mišem pozicionirate na ovu strjelicu desno žuto ponudit će vam se „configure“:
Ovo što sam zažutio su parametri koje ručno možete mijenjati, po defaultu sve wlc radi automatski ali u zadatku će se tražiti da ručno promijenite kanal i snagu emitiranja samo za 802.11 b/g/n!
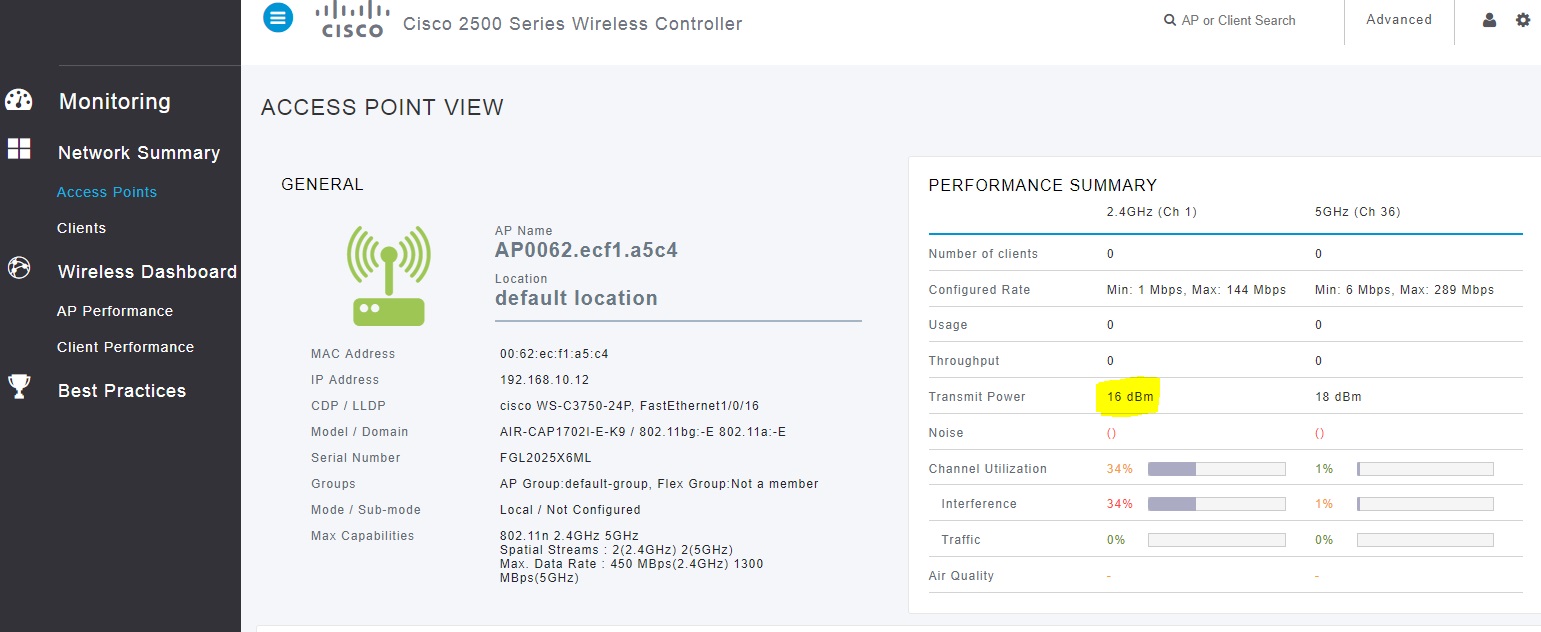
Također, tražit će se od vas da nakon što promijenite snagu napišete i izračunate u dBm i mW za koliko se dogodila promjena, evo primjera (snagu emitiranja možete pronaći u početnom monitoringu, ne advanced, pod tabom acess points, žuto i tu vrijednost pretvorite u mW, odnosit će se samo na 2.4 GHz):
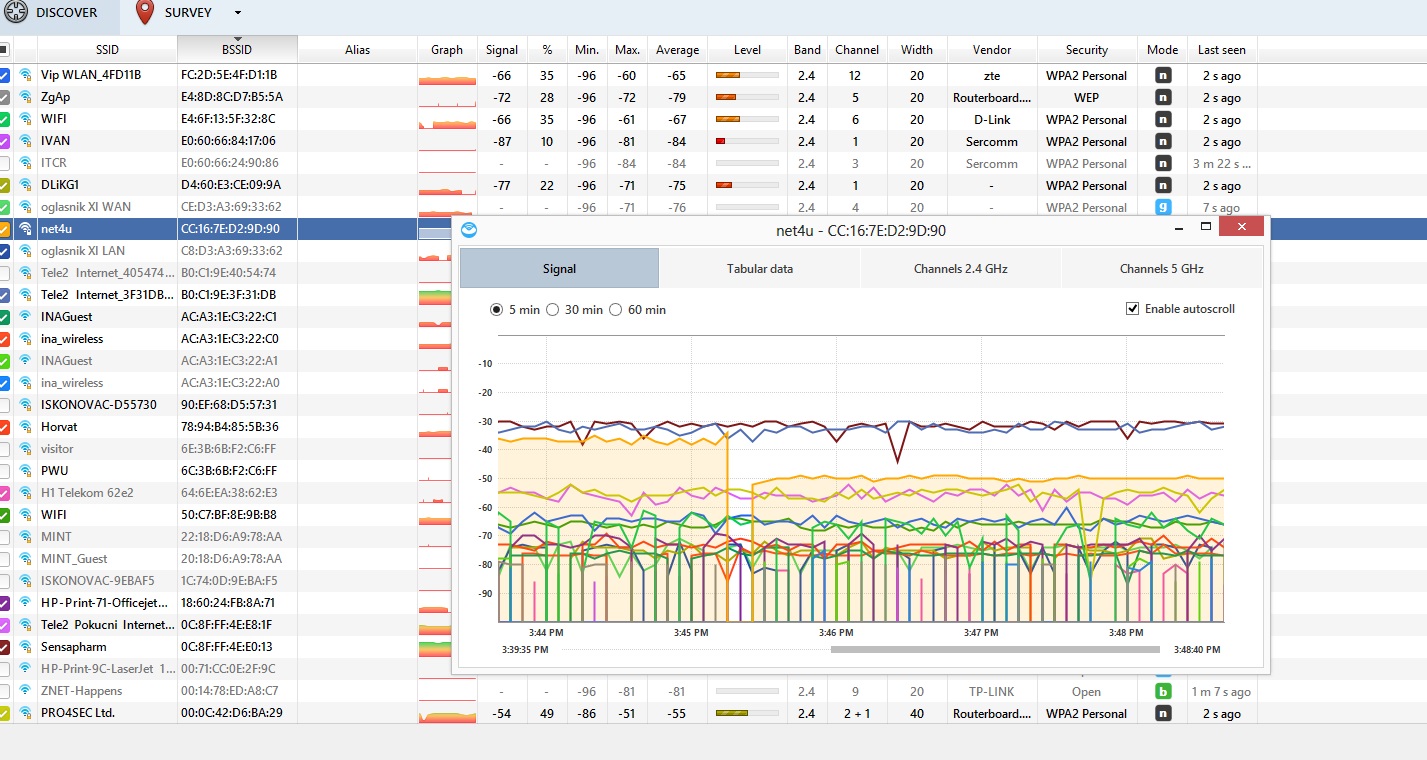
3. NetSpot
Također dio prikaza (mjerenja) ćete odraditi s alatom NetSpot (svi ga možete skinuti doma na svoja računala https://www.netspotapp.com/netspotpro.html i isprobati, jako je jednostavan za koristiti). Na ispitu će vas sve čekati već pripremljeno tako da nećete gubiti vrijeme na instalacije.
A evo i prikaza gdje se lijepo vidi razlika u signalu kada sam mijenjao snagu emitiranja signala, u ovom manjem prozoru žuta linija označava moju mrežu net4u u odnosu na druge, ovdje možete vidjeti kako se moj signal preklapa sa drugima, a pogotovo kada sam smanjio snagu emitiranja možete vidjeti prekid žute linije i pad s -38 dB na -50 dB što je velika razlika i utječe na perfomanse, nešto slično tome ćete i vi na ispitu napraviti i testirati:
vlan 10
name nesto
vlan 20
name IT
vlan 30
name Guest
interface FastEthernet1/0/1
description veza prema routeru – na svaki interface OBAVEZNO stavljati description !!!
switchport trunk encapsulation dot1q
switchport mode trunk allowed vlan 1,10,20,30 – potrebno je točno specificirati VALN-ove!!!
switchport mode trunk
!
interface FastEthernet1/0/2
description AP
switchport trunk encapsulation dot1q
switchport trunk allowed vlan 1,10,20,30
switchport mode trunk
!
interface FastEthernet1/0/3
description PC
switchport access vlan 1 – ovo se ne piše tj. ostaje u defaultnom vlan-u
switchport mode access
spanning-tree portfast
!
interface VLAN 1
ip address 192.168.1.2 255.255.255.0 – može se staviti bilo koji ip iz range-a za management
!
Line vty 0 15 – omogućujemo udaljeni pristup (telnet)
Password xxxx – stavite po želji
no ip domain-lookup
line con 0
logging synchronous
pass class
login
line vty 0 15
pass class
login
enab sec class
ROUTER
ip dhcp pool IT-GrupaX – naziv pool-a stavljate po želji
network 192.168.20.0 255.255.255.0
dns-server 8.8.8.8
default-router 192.168.20.1
!
ip dhcp pool GUEST-GrupaX
network 192.168.30.0 255.255.255.0
dns-server 8.8.8.8
default-router 192.168.30.1
!
ip dhcp pool AP
network 192.168.10.0 255.255.255.0
default-router 192.168.10.1
dns-server 8.8.8.8
!
ip dhcp pool PC
network 192.168.2.0 255.255.255.0
dns-server 8.8.8.8
default-router 192.168.2.254
!
interface FastEthernet0/0
tu samo no shu
!
interface FastEthernet0/0.1
encapsulation dot1Q 1 – enkapsulacija po vlanu kojem pripada
ip address 192.168.1.1 255.255.255.0
ip nat inside – naredba za NAT ide na svaki subinterface da bi vam radio pristup na Internet
!
interface FastEthernet0/0.10
description AP
encapsulation dot1Q 10
ip address 192.168.10.1 255.255.255.0
ip nat inside
ip virtual-reassembly
!
interface FastEthernet0/0.20
description IT
encapsulation dot1Q 20
ip address 192.168.20.1 255.255.255.0
ip nat inside
ip virtual-reassembly
!
interface FastEthernet0/0.30
description GUEST
encapsulation dot1Q 30
ip address 192.168.30.1 255.255.255.0
ip nat inside
ip virtual-reassembly
access-group GUEST in – primjenjujemo acc listu za goste
!
interface FastEthernet0/1
description WAN
ip address 10.10.2.15X 255.255.255.0
ip nat outside – na WAN sučelje obavezno se stavlja naredba nat outside!!!
ip virtual-reassembly
duplex auto
ip route 0.0.0.0 0.0.0.0 10.10.2.254 – ne zaboravite staviti defaultnu rutu s next hop adresom!!!
!
ip nat inside source list WIFI interface FastEthernet0/1 overload – sav promet se natira u wan int.
!
ip access-list extended WIFI – access lista potrebna za nat može standardna ili extended !!!
permit ip 192.168.1.0 0.0.0.255 any
permit ip 192.168.10.0 0.0.0.255 any
permit ip 192.168.20.0 0.0.0.255 any
permit ip 192.168.30.0 0.0.0.255 any
!
ip access-list extended GUEST – dopuštamo gostima samo izlaz na Internet, cijeli LAN zabranjujemo
deny ip 192.168.30.0 0.0.0.255 192.168.1.0 0.0.0.255
deny ip 192.168.30.0 0.0.0.255 192.168.10.0 0.0.0.255
deny ip 192.168.30.0 0.0.0.255 192.168.20.0 0.0.0.255
permit ip any any – ne zaboravite na kraju dozvoliti svemu ostalom
KONFIGURACIJA –> AP
welcome – next
ip address -ostavi default DHCP
single point – Do not enable single point setup
time settings next
password stavi nesto, complexity ne, uzmi neki jedostavni
SSID – IT-grupaX –> prvo ide configuration ITa onda gostiju
dalje no security ili ako pise u ispitu onda nesto stavim i upisem neki password
zatim kojem vlanu bude pripadao taj IT, to pise u ispitu. Sad je IT u 20, a na ispitu mozda bude nesto drugo
enable – yes
guest name – Guest-grupaX
dalje, no security, password nista
vlan ID sad je 30 jer su gosti u 30
dodatna mogucnost da redirecta, ne treba, next
finish
i onda me izbaci van pa se prijavim s onim passwordom koji sam stavila
captive portal
create
Gosti
Save
local users
gost1
postavi neki password
stavi da propada grupi Gosti
instance configuration
umjesto create wiz_cp_inst1
jedino bitno je verification:
izaberi local
user group name: Gosti
save
ACCESS POINT CISCO WAP 321
Na AP-u je potrebno konfigurirati 2 virtualna interface-a VAP0 i VAP1:
VAP0 – vlan id 20 – SSID IT-GrupaX
VAP1 – vlan id 30 – SSID GUEST-GrupaX
Pod tabom LAN interface – potrebno postaviti management vlan id 10 – Vlan u kojem je naš AP
ipadresa=input(“Unesite IP adresu: “)
a,b,c,d=ipadresa.split(‘.’)
print(a,b,c,d)
raspon=range(1,254)
print(raspon)
if (int(a) in raspon) and (int(b) in raspon) and (int(c) in raspon) and (int(d) in raspon):
print(“IP adresa je ispravna”)
else:
print(“IP adresa nije ispravna”)
———————————————————————————
#kopiranje po ekstenziji
import os
import shutil
popisfile=os.listdir(‘.’)
ekstenzije=set()
for datoteka in popisfile:
if os.path.isfile(datoteka):
if datoteka.rfind(‘.’)>0:
ekstenzije.add(datoteka[datoteka.rfind(‘.’)+1:])
else:
ekstenzije.add(‘bez_ekstenzije’)
for ekstenzija in ekstenzije:
os.mkdir(ekstenzija)
for datoteka in popisfile:
if os.path.isfile(datoteka):
if datoteka.rfind(‘.’)>0:
shutil.copy(datoteka,datoteka[datoteka.rfind(‘.’)+1:])
else:
shutil.copy(datoteka,’bez_ekstenzije’)
print(‘Datoteka ‘+datoteka+’ iskopirana u pripadajuci folder’)
———————————————————————————
#ispisuje popis direktorija iz trenutnog
import os
popisdirektorija=list()
popisdirektorija=os.listdir(‘.’)
print (popisdirektorija)
for nesto in popisdirektorija:
if os.path.isfile(nesto):
popisdirektorija.remove(nesto)
print (popisdirektorija)
———————————————————————————
#procesi više od jedan posto
import psutil
korisnici=set()
a=psutil.pids()
for b in a:
proces=psutil.Process(b)
if proces.memory_percent()>1:
print(proces.name())
try:
if proces.username():
print(proces.name(),proces.username())
except:
print(proces.name,’ nije moguće prikazati’)
———————————————————————————
#ispisuje datoteke iz trenutnog direktorija grupirane po ekstenzijama i njihovu sumiranu velicinu
import os
import sys
popisdirektorija=list()
#kreiraj fajl
fajl=open(‘popis.lst’,’w’)
#radi u lokalnom direktoriju
imedirektorija=’.’
#koristi skup da ne moras izbacivati diplikate ekstenzija
ekstenzije=set()
velicina=0
for datoteka in os.listdir(‘.’):
if os.path.isfile(datoteka):
if datoteka.rfind(‘.’)>0:
ekstenzije.add(datoteka[datoteka.rfind(‘.’)+1:])
for ekstenzija in ekstenzije:
for nesto in os.listdir(imedirektorija):
if nesto[nesto.rfind(‘.’)+1:]==ekstenzija:
fajl.writelines(nesto+’ ‘+str(os.path.getsize(nesto))+’\n’)
velicina=velicina+os.path.getsize(nesto)
#ispisuje popis direktorija za neki zadani direktorij. DIREKTORIJ JE HARDKODIRAN U SKRIPTI
#za vježbu dodati ime direktorija kao argumente skripte. isdir() testira po imeni koje nema path
import os
import sys
popisdirektorija=list()
imedirektorija=’c:\\’
##sys.argv[1]
for nesto in os.listdir(imedirektorija):
if os.path.isdir(imedirektorija+nesto):
popisdirektorija.append(nesto)
print (popisdirektorija)
———————————————————————————
#za zadanu ekstenziju ispisuje ukupnu velicinu u fajl
import os
import sys
for nesto in os.listdir(imedirektorija):
if nesto[nesto.rfind(‘.’)+1:]==ekstenzija:
fajl.writelines(nesto+’ ‘+str(os.path.getsize(nesto))+’\n’)
fajl.close()
———————————————————————————
#zadana ekstenzija velicina i grupna velicina
import os
import sys
popisdirektorija=list()
fajl=open(‘popis.lst’,’w’)
imedirektorija=’.’
ekstenzija=’py’
velicina=0
for nesto in os.listdir(imedirektorija):
if nesto[nesto.rfind(‘.’)+1:]==ekstenzija:
fajl.writelines(nesto+’ ‘+str(os.path.getsize(nesto))+’\n’)
velicina=velicina+os.path.getsize(nesto)
fajl.write(str(velicina))
fajl.close()
Napravite instalaciju potrebnih paketa i repozitorija, ugasiti firewall i prebaciti SELinux u permissive mod
yum –y update
yum -y install centos-release-gluster37
wget –O /etc/yum.repos.d/gluster.repo http://bit.ly/2ror0PO
ili puni link https://download.gluster.org/pub/gluster/glusterfs/3.7/LATEST/EPEL.repo/glusterfs-epel.repo)
rpm –ivh http://bit.ly/1L5Ikxb
ili puni link https://dl.fedoraproject.org/pub/epel/epel-release-latest-7.noarch.rpm)
yum –y update
yum –y install glusterfs glusterfs-cli glusterfs-libs glusterfs-server samba
systemctl disable firewalld.service
systemctl stop firewalld.service
setenforce 0
Napraviti konfiguraciju drugog diska za korištenje u gluster filesystemu:
pvcreate /dev/sdb
vgcreate vg_cluster /dev/sdb
lvcreate –L 5G –n brick1 vg_cluster
lvcreate –L 5G –n brick2 vg_cluster
mkfs.xfs /dev/vg_cluster/brick1
mkfs.xfs /dev/vg_cluster/brick2
mkdir –p /bricks/brick1
mkdir –p /bricks/brick2
mount /dev/vg_cluster/brick1 /bricks/brick1
mount /dev/vg_cluster/brick2 /bricks/brick2
Time smo napravili LVM konfiguraciju sa volume grupom koja se zove vg_cluster, u kojoj smo napravili dva logička volumena od 5GB, imena brick1 i brick2, koje smo formatirali sa XFS filesystemom i montirali ih u direktorije /bricks/brick1 i /bricks/brick2
/etc/samba/smb.conf
Na kraj dodati:
kernel share modes = No
gluster volume set glustervol1 stat-prefetch off
gluster volume set glustervol1 server.allow-insecure on
gluster volume set glustervol1 storage.batch-fsync-delay-usec 0
/etc/glusterfs/glusterd.vol
u konfiguracijski dio (među opcije), dodajte:
option rpc-auth-allow-insecure on
Konfiguracija je gotova. Pokušajte se sa svojeg Windows klijenta spojiti na vaš gluster share.
Primjera radi, ako ste koristili gluster17.szpp.local koji ima adresu 10.10.7.117, podignite
Windows Explorer i u njemu u adresni prostor napišite:
\\10.10.7.117\gluster-glustervol1
AD replikacija Povezati sve replike imenika koje se moraju replicirati
Kontrolirati cijenu i latenciju replikacije
Preusmjeravati replikaciju između site-ova
Utjecati na afinitete klijenata
Unutar site-a replikacija je optimizirana za brzinu:
– Konekcije između domain kontrolera unutar iste domene su uvijek organizirane u obliku prstena
– Replikacija unutar site-a se pokreće pomoću mehanizma koji detektira promjene u AD-u, događa se s konfigurabilnim zakašnjenjem jer se najčešće nekoliko promjena događa odjednom
– Podaci nisu kompresirani Između site-ova replikacija je optimizirana za što manje trošenje bandwitha:
– Podaci su kompresirani
– Svaka promjena samo jednom prelazi preko linka
– Replikacija se događa u konfigurabilnim intervalima
– Intersite topologija ima jednu konekciju za bilo koja dva site-a za svaku imeničku particiju i u praksi ne sadrži redundantne konekcije
Multimaster replikacija – svi DCi prihvačaju zahtjeve za izmjenom atributa AD objekata za koje su autoritativni
Pull replikacija
Store-and-forward replikacija
State-based replikacija
resetiranje passworda Replikacija lozinki
– Replikacije je drukčija i od normalne i hitne replikacije
– Promjena lozinke se uvijek prvo odmah i bez obzira na sve intervale replicira na PDC
– Replikacija na ostale DC ove u domeni ide normalnim putem
– Ako je iz nekog razloga nemoguće replicirati odmah na PDC, replikacija ide normalnim putem
– Group Policy postavka “Contact PDC on logon failure” može biti „Disabled” da bi smanjili promet prema PDC-u koji je u drugom site-u, u tom slučaju replikacije ide normalnim putem
powershell kada se user zadnji put ulogirao
Get-ADUser -identity Administrator -properties * | FT Name, LastLogonDate
koliko se puta logirao
Get-ADUser -Filter * -Properties logonCount -Server LON-DC1 | Select Administrator, logonCount
koliko je puta failo login
Get-ADUser -Filter {Name -eq "Administrator"} -Properties * | Select-Object Name, msDS-FailedInteractiveLogonCountAtLastSuccessfulLogon
zadnji put postavljan password
Get-ADGroupMember -Identity "Domain Admins" | Get-ADUser -Properties PasswordLastSet | Select-Object -Property Name, PasswordLastSet
tipovi openLDAP servera?
Samba4 vs Samba3
Samba 3 – file/print/old style NT domains
Samba 4 – AD controller
vCenter Single Sign On (v5)
– ponaša se kao autentikacijski servis za sv eVMWare aplikacije
– aplikacije međusobno komuniciraju preko tokena
Korištenje vCenter Single Sign-On ima slijedeće benefite:
-Brža autorizacija, autentifikacija, pojednostavljenje procesa
-Mogućnost VMware aplikacijama da „vjeruju jedna drugoj”
-Arhitektura koja je spremna za multi-instance i multi-site konfiguracije za kompletno autentifikacijsko rješenje kroz cijelu VMware-based IT infrastrukturu
vCenter Single Sign-On ima slijedeće mogućnosti:
-Podržava otvorene standarde
-Podržava višestruke „repozitorije” za autentifikaciju, kao AD i OpenLDAP
-Pruža mogućnost za spajanje više vCenter Server instanci
vCenter Single Sign On (v6)
– nije više servis, postaje dio općenitog servia PSC (Platform Services Controller)
LDAP
LDAP – imenički servis, nije klasična „baza podataka”
– nema naprednih mogućnosti za roll-back, komplicirane transakcije kao baze – za kompleksne update procedure
– kod direktorija nije bitno ako se prilikom sinhronizacije pojave nekonzistentnosti, ali na kraju se moraju sinhronizirati u konzistentno stanje
– optimizacija za operacije tipa read, browse i search
– LDAP – Lightweight Directory Access Protocol, lightweight protokol za pristup imeničkim servisima po X.500-based direktorijima (RFC 2251,…)
– LDAP koristi TCP/IP i općenito konekcijski orijentirane protokole za komunikaciju
– LDAP model bazira se na zapisima – kolekcija atributa bazirana na unikatnom DN-u (Distinguished Name)
– svaki atribut ima tip i jednu ili više vrijednosti – npr. cn za Common Name, mail za e-mail adrese
– informacije su organizirane u stablastim strukturama
– strukture su obično prilagođene odjelima, lokacijama, …
– postoje i stand-alone implementacije LDAP-a na Linuxu – slapd (lightweight X.500 directory server)
– različite verzije – LDAPv2 i v3 – v2 obsolete
Koristimo za:
– Autentifikacija i security – za različite servise
– Standalone ili connected na neki drugi imenički servis
– Access control – po IP-u, imenu domene, …
– Replikacija (HA, pouzdanost) uz korištenje slurpd-a uz slapd
Vrste konfiguracije:
– lokalni directory service – bez interakcije sa drugim directory serverima
– lokalni directory service with referrals – lokalni uz referral za sve upite izvan naše domene
– replicirani directory service – koristimo slurpd za propagaciju promjena između master i slave nodeova
– distribuirani – miješani model, više servera, superior/subordinate serveri, …. NIS/NIS+
– NIS/NIS+ (Network Information Service) – client-server directory protokol koji se koristi u UNIX-oidnim okolinama
– često ga zovu i Yellow Pages ili YP
– može imati master i slave servere
– NIS+ – poboljšana verzija sa podrškom za enkripciju i autentifikaciju preko sigurnog kanala
– da bi NIS+ radio, moraju biti podignuti i podešeni servisi portmap/rpcbind i ntp/time servis
– potrebno poinstalirati yp* pakete
– nakon instalacije, klijenti koriste zajedničke passwd, shadow, i slične datoteke OpenLDAP vs NIS/NIS+
– LDAP nije samo UNIX-specific, podržan je od više operacijskih sustava
– Active Directory je LDAP-based
– dosta jednostavna implementacija Kerberos autentifikacije kod LDAP-a
– NIS nema skalabilnosti, u osnovnoj verziji nema enkripcije
– integracija – mail, address bookovi, replikacija BIND servera, SAMBA autentifikacija
– NIS/NIS+ su obsolete, samo u rijetkim corporate mrežama
– LDAP se može proširiti dodatnim funkcijama
– LDAP se nakon osnovne konfiguracije lako integrira sa ostalim servisima SSH i LDAP
– SSH je kao secure protokol za terminalnu komunikaciju (i FTP) idealan kandidat za LDAP autentifikaciju
– koristimo LDAP kao centralni imenički servis kroz koji dijelimo korisnička imena i lozinke (kao AD)
– ukoliko imamo podešen LDAP server i na njemu sve potrebne podatke – korisnička imena, lozinke i sl., konfiguracija LDAP klijenata je trivijalan zadatak
– requirementi – poinstaliran SSH server, authconfig* paketi (ako želimo automatski mountati korisničke home direktorije, i autofs)
– uobičajeno se koristi sa autofs-om, servisom koji može automatski mountati korisničke home direktorije preko NFS-a (UNIXoidni file/folder sharing protokol)
https://download.samba.org/pub/samba/stable/samba-4.0.6.tar.gz skripte i komande prepisivati, jer html zna autoformatirati gluposti
linux stroj
vim skripta.sh
#!/bin/bash
yum -y install gcc glibc make python-devel libacl*
wget https://download.samba.org/pub/samba/stable/samba-4.0.6.tar.gz
tar -xzvf samba-4.0.6.tar.gz
cd samba-4.0-6.tar.gz
./configure --enable-selftest
make && make install
chmod +x skirpita.sh
./skripta.sh
windows stroj
postavljanje mreže – 192.168.20.253, dns 192.168.20.250, isključiti ipv6
c:\windows\hosts:
192.168.20.253 dc cd.example.com
192.168.20.250 rhel6 rhel6.example.com
promijeniti ime stroja – dc
isključiti firewall
linux stroj
service NetworkManager stop
chkconfig NetworkManager off
service iptables stop
chkconfig iptables off
setenforce 0
getenforce
vim /etc/sysconfig/network-scripts/ifcfg-eth0
namjestiti mrežu – IP adresa, DNS (192.168.20.253, sam na sebe), disable IPv6
Promijeniti ime stroja
u hosts file dodati ip adresu linuxa i ip adresu windows stroja
Linux stroj
service iptables stop
chkconfig iptables off
setenforce 0
service NetworkManager stop
chkconfig NetworkManager off
vim /etc/sysconfig/network-scripts/ifcfg-eth0 (paziti koji eth je za internu mrežu, koji za van)
Xen hipervizor kao platforma ima dva dijela -hipervizor koji se brine za sve osnovne funkcije (upravljanje CPU i memorijskim resursima, scheduling virtualnih mašina itd.) i jednu posebnu virtualnu mašinu koja se zove Domain0 (dom0) koja ima direktan pristup hardveru, upravljačkim programima i kompletnom procesu upravljanja drugim virtualnim mašinama.
KVM hypervisor
Kernel-based Virtual Machine (KVM) je druga, novija generacija virtualizacijske tehnologije pod open-source operacijskim sustavima. Implementacija KVM-a je potpuno drugačija od Xen-a, pošto je KVM zapravo kernel modul koji pretvara Linux kernel u bare-metal
XEN vs KVM
Dva su vrlo bitna detalja zbog kojih je arhitektura KVM-a bolja od arhitekture Xen hipervizora
1. KVM je napravljen nakon što su Intel i AMD napravili procesore koji imaju hardverski podržanu virtualizaciju (hardware assisted virtualization, Intel VT-x, AMD-V). Stoga KVM nužno treba ovakve procesore da bi mogao raditi. Također, kako su u vrijeme kada je završen rad na KVM-u 64-bitni procesori već bili standard na PC platformi, KVM traži 64-bitni operacijski sustav kako bi radio što je zapravo i logično -nema nikakvog smisla koristiti virtualizaciju na 32-bitnom operacijskom sustavu zbog ograničenosti memorijskog adresiranja navedenih operacijskih sustava.
2. KVM ne pokušava “izmišljati toplu vodu” i koristi sve već postojeće metode koje posjeduje Linux kernel -upravljanje memorijom, procesima, ulazno/izlaznim operacijama, sigurnosnim postavkama i sl. Sve su to metode koje već postoje u Linux operacijskim sustavima i KVM ih koristi kao postojeće elemente.
Konfiguracija
Za početak, potrebno je poinstalirati potrebne pakete. Pokrenite slijedeće komande: yum –y install qemu-kvm qemu-img virt-manager libvirt* yum –y groupinstall virtualization-client virtualization-platform virtualization-tools chkconfig libvirtd on; service libvirtd start
Kao root korisnik, pokrenite komandu: virsh net-start default
—– prema računalima —— interface range fastEthernet 0/2
sw1(config–if–range)#switchport mode access
switchport access vlan 10exit
————Drugi interfejs interface range fastEthernet 0/3
switchport mode access
switchport access vlan 40
exit ————- TRUNK —– prema routeru i između switcheva ——-
interface range fastEthernet 0/1
switchport mode trunk
exit
no shutdown
—- ako se fula sa vlanovima no switchport access vlan name-or-id
Command rejected: An interface whose trunk encapsulation is “Auto” can not be configured to “trunk” mode. Ako ovo izleti morate promjeniti enkapsulaciju:
sw1(config)# —————–BANNER——– sw1(config)# banner motd $***neovlastenim osobama pristup zabranjen***$
————-DOmena na ruteru —————
R1(config)#ip domain-name vspr.local
—————-KRIPTO PRIJENOS ——
R1(config)#crypto key generate rsa The name for the keys will be: R1.vspr.local
Choose the size of the key modulus in the range of 360 to 2048 for yourGeneral Purpose Keys. Choosing a key modulus greater than 512 may takea few minutes.How many bits in the modulus [512]: 1024
% Generating 1024 bit RSA keys, keys will be non–exportable…[OK]
kad se završi naredba za pokretanje je startx, pokretanje će trajati 10ak sekundi plus upozorenje da nije okraditi kao root
1. (5 bodova) Promijenite IP adresu na prvu ispravnu i slobodnu IP adresu koju ste dobili u VLAN-u 40, te DNS i GW postavke. Izmjene moraju biti trajne. promjeni datoteku /etc/sysconfig/network-scripts/ifcfg-eth0
vim /etc/sysconfig/network-scripts/ifcfg-eth0
DEVICE=eth0
IPADDR=10.160.0.2
NETMASK=255.255.255.0
NETWORK=10.160.0.0
GATEWAY=10.160.0.1
BROADCAST=192.168.1.255
DNS1=8.8.8.8
ONBOOT=yes
NAME=eth0
onda da se prihvate promjene napravi ovo:
service network restart
chkconfig network on
Prva ispravna i slobodna
Dakle vlan 40 ima range 10.160.0.1 – 10.160.0.254 s tim da je 0.1 ZAUZET!!!!!
Dakle vaš lunix stroj mora imati 10.160.0.2 adresu http://lmgtfy.com/?q=change+ip+address+centos+6.5
prvi hit je detaljno sve sto vam treba, dns, gw
ako vam je lakše pozovite iz konzole gedit /etc/resolv.conf umjesto vi /etc/resolv.conf
2. (5 bodova) Na dodatnom disku /dev/sdb napravite jednu particiju, formatirajte sa ext4 i spojite pod/virtual mapu (ako je potrebno, stvorite mapu /virtual). Omogućite da se to događa i nakon ponovnogpokretanja računala.
setings u virtulanoj mašini > add hdd
fdisk -l
/dev/sdb#moram imati taj disk
cfdisk
ili
fdisk /dev/sdb #particioniranje hdd
n – nova particija > p – primarna particija > 1 > enter > enter >p – izlist particije > w –#zapisivanje informacija i izlazak
reboot #restartanje mašine
#formatiranje:
mkfs.tab tipka #izlist komandi
mkfs.ext4 /dev/sdb1 #kreiranje foldera
mkdir /virtual #trajno mountanje vi /etc/fstab #na kraju dodajemo /dev/sdb1 /virtual ext4 defaults 1 2
esc dvotočka wq! izlaz
mount -a#da nam posloži hard diskove
df#da vidim jel mi vidi hard disk (dev/sdb1)
3. (2 boda) Promijenite korisniku root lozinku na R@inb0w2!
passwd root
4. (1 bod) Trenutno i trajno ugasite servise postfix i cups.
service postfix stop
service cups stop
chkconfig postfix off
chkconfig cups off
5. (4 boda) Podesite prava pristupa u mapi /home/ivana tako da korisnica ivana bude vlasnica direktorija ida u njega može i čitati i pisati. Svim ostalim klasama korisnika zabranite pristup. Ako korisnica ivana nepostoji na virtualnoj mašini, stvorite ju (koristeći komandu adduser ivana).
adduser –m ivana
ili
mkdir /home/ivana #promijena vlasništa na folderu chown ivana /home/ivana #ivana mora imati samo ona prava chmod 700 /home/ivana
Linux opcionalni dio (17 bodova):6. (2 boda) Napravite trajno brisanje konfiguracije iptables firewalla (ne trajno gašenje niti brisanje servisa,
nego trajno brisanje konfiguracije uz trajno aktivni servis).
cd /etc/sysconfig
ls -al iptables
vi iptables i maknem sve komande
brisanje iptablesa
rm iptables
y
7. (6 bodova) Omogućite pokretanje apache web servera, servisa httpd (instalacijski cd spojite pod/media/cdrom). Servis mora biti automatski startan nakon restarta virtualnog servera.
mount /dev/cdrom /media/cdrom –t iso9660
yum install httpd*
chkconfig httpd on
8. (2 boda) Podesite rsyslog servis da sve kernel poruke zapisuje u datoteku /var/log/kernel. Koristitepostojeću konfiguraciju u konfiguracijskoj datoteci /etc/rsyslog.conf.
vi /etc/rsyslog.conf
odkomentiramo ispred kern.* i dodamo /var/log/kernel…..ili kak je zahtjevano
service rsyslog restart
ll /var/log/kernel
9. (2 boda) Za korisnika root kreirajte RSA SSH ključeve sa praznim privatnim ključem.
ssh-keygen –t rsa
10. (5 bodova) Omogućite udaljeni pristup SSH protokolom (za instalaciju servisa sshd jepotrebno CD uređaj spojiti na /media/cdrom).
yum install openssh
service sshd start
chkconfig sshd on – trajno paljenje
____________
– namjestite IP adresu na prvu ispravnu i slobodnu IP adresu koju ste dobili u VLAN 40 . DNS i GW postavke moraju biti trajne. promjeni datoteku /etc/sysconfig/network-scripts/ifcfg-eth0
nano /etc/sysconfig/network–scripts/ifcfg-eth0
DEVICE=eth0
IPADDR=192.168.1.5
NETMASK=255.255.255.0
NETWORK=192.168.1.0
GATEWAY=192.168.1.1
BROADCAST=192.168.1.255
DNS1=8.8.8.8
ONBOOT=yes
NAME=eth0
onda da se prihvate promjene napravi ovo: service network restart
Kreirajte korisnika students lozinkom Arti321
Kreirajte grupu korisnici 2. Kreirajte korisnika student i lozinkom Arfis.321
adduser student
passwd student 3. dodaj grupu korisnici groupadd korisnici
Dodijeljeni disk formatirajte na ext2 i spojite pod /mnt/podaci mapu i omogućite da se ne izgubi kod slijedećeg pokretanja računala Postavite korisnika računala student i grupu korisnici kao vlasnika /mnt/podaci mape
#pod uvjetom da ti postoje korisnik i grupa korisnici napraviš ovo
chown student:korisnici /mnt/podaci
NAPREDNI LINUX –Promjenite root korisniku lozinku na Sifra123
passwd–Dodajte korisnika student u grupu korisnici usermod -a –G korisnici student–Omogućite udaljeni pristup SSH protokolom (instalacijski cd spojite pod ….) Korisnik rootne smije imati direktni pristup preko tog protola.–#ovo neznam kako isprobati jel neznam cemu se ima pristup–#ako je instaliran sshd ovako se pokrece –servicesshd start–#ovo je samo ako zelis da se automatski pali poslje reboota –chkconfig sshd on defaults–#da se zabrani rootu pristup treba se modificirati /etc/ssh/sshd_config –nano /etc/ssh/sshd_config–#pronadi PermitRootLogin yes to ti ovako izgleda–#PermitRootLogin yes–#ovako treba izgledati (nesmije imati # ispred jel to znaci komentar) PermitRootLogin no–Omogućite automatsko pokretanje postfix deamona na svim računalima chkconfig postfix on defaults–Omogućite pristup aplikaciji putty i MS-CLI2 računala prema Linux poslužiteljima. #ovo neznam sto znaci mozda se misli da maknes firewall ako je podignut ?#micanje firewallaiptrables -F
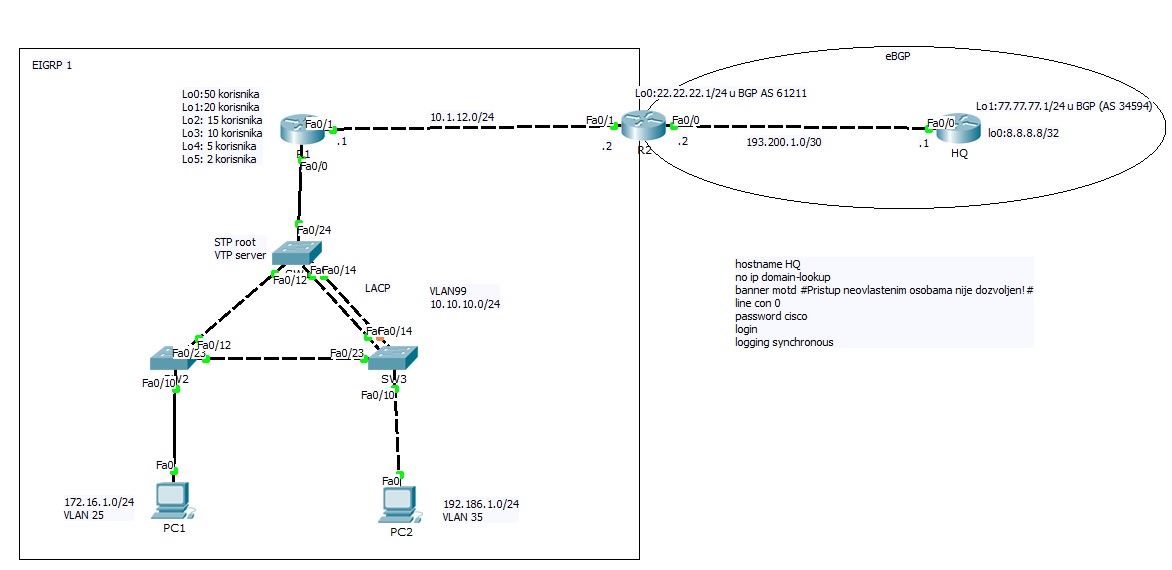
Current configuration : 1786 bytes
!
version 12.4
no service timestamps log datetime msec
no service timestamps debug datetime msec
no service password-encryption
!
hostname R1
!
!
!
enable secret 5 $1$mERr$9cTjUIEqNGurQiFU.ZeCi1
!
!
ip ssh version 1
no ip domain-lookup
ip domain-name lab
!
!
spanning-tree mode pvst
!
!
interface Loopback0
ip address 172.16.0.62 255.255.255.192
!
interface Loopback1
ip address 172.16.0.94 255.255.255.224
!
interface Loopback2
ip address 172.16.0.126 255.255.255.224
!
interface Loopback3
ip address 172.16.0.142 255.255.255.240
!
interface Loopback4
ip address 172.16.0.150 255.255.255.248
!
interface Loopback5
ip address 172.16.0.154 255.255.255.252
!
interface FastEthernet0/0
no ip address
duplex auto
speed auto
!
interface FastEthernet0/0.25
encapsulation dot1Q 25
ip address 172.16.1.1 255.255.255.0
ip helper-address 10.1.12.2
!
interface FastEthernet0/0.35
encapsulation dot1Q 35
ip address 192.168.1.1 255.255.255.0
ip helper-address 10.1.12.2
!
interface FastEthernet0/0.99
encapsulation dot1Q 99
ip address 10.10.10.1 255.255.255.0
!
interface FastEthernet0/1
ip address 10.1.12.1 255.255.255.0
duplex auto
speed auto
!
interface Vlan1
no ip address
shutdown
!
router eigrp 1
passive-interface FastEthernet0/0.25
passive-interface FastEthernet0/0.35
network 172.16.0.0
network 10.0.0.0
network 192.168.0.0 0.0.255.255
no auto-summary
!
ip classless
!
!
ip access-list standard TELNET
permit host 172.16.1.101
!
banner motd ^CPristup neovlastenim osobama nije dozvoljen!^C
!
!
!
!
line con 0
password cisco
logging synchronous
login
!
line aux 0
!
line vty 0 4
access-class TELNET in
password cisco
login
transport input ssh
line vty 5 15
access-class TELNET in
password cisco
login
transport input ssh
!
!
!
end
R2#show run
Building configuration…
Current configuration : 1996 bytes
!
version 12.4
no service timestamps log datetime msec
no service timestamps debug datetime msec
no service password-encryption
!
hostname R2
!
!
!
enable secret 5 $1$mERr$9cTjUIEqNGurQiFU.ZeCi1
!
!
ip dhcp excluded-address 172.16.1.1 172.16.1.100
ip dhcp excluded-address 192.168.1.1 192.168.1.100
!
ip dhcp pool VLAN25
network 172.16.1.0 255.255.255.0
default-router 172.16.1.1
dns-server 8.8.8.8
ip dhcp pool VLAN35
network 192.168.1.0 255.255.255.0
default-router 192.168.1.1
dns-server 8.8.8.8
!
!
no ip domain-lookup
ip domain-name lab
!
!
spanning-tree mode pvst
!
!
interface Loopback0
ip address 22.22.22.1 255.255.255.0
!
interface FastEthernet0/0
ip address 193.200.1.2 255.255.255.252
ip access-group ACL in
ip nat outside
duplex auto
speed auto
!
interface FastEthernet0/1
ip address 10.1.12.2 255.255.255.0
ip nat inside
duplex auto
speed auto
!
interface Vlan1
no ip address
shutdown
!
router eigrp 1
redistribute static metric 100000 10 255 1 1500
network 10.0.0.0
auto-summary
!
router bgp 61211
bgp log-neighbor-changes
no synchronization
neighbor 193.200.1.1 remote-as 34594
network 22.22.22.0 mask 255.255.255.0
!
ip nat inside source list NAT interface FastEthernet0/0 overload
ip classless
ip route 0.0.0.0 0.0.0.0 193.200.1.1
!
!
ip access-list standard TELNET
permit host 172.16.1.101
ip access-list standard NAT
permit 172.16.0.0 0.0.0.255
permit 172.16.1.0 0.0.0.255
permit 192.168.1.0 0.0.0.255
ip access-list extended ACL
permit tcp any host 22.22.22.1 eq www
permit tcp any host 22.22.22.1 eq 443
permit tcp any host 22.22.22.1 eq 8080
permit icmp any host 22.22.22.1 echo
permit ip any host 193.200.1.2
!
banner motd ^CPristup neovlastenim osobama nije dozvoljen!^C
!
!
line con 0
password cisco
logging synchronous
login
!
line aux 0
!
line vty 0 4
access-class TELNET in
password cisco
login
transport input ssh
line vty 5 15
access-class TELNET in
password cisco
login
transport input ssh
!
!
!
end
HQ#show run
Building configuration…
Current configuration : 759 bytes
!
version 12.4
no service timestamps log datetime msec
no service timestamps debug datetime msec
no service password-encryption
!
hostname HQ
!
!
!
spanning-tree mode pvst
!
!
!
interface Loopback0
ip address 8.8.8.8 255.255.255.255
!
interface Loopback1
ip address 77.77.77.1 255.255.255.0
!
interface FastEthernet0/0
ip address 193.200.1.1 255.255.255.252
duplex auto
speed auto
!
interface FastEthernet0/1
no ip address
duplex auto
speed auto
shutdown
!
interface Vlan1
no ip address
shutdown
!
router bgp 34594
bgp log-neighbor-changes
no synchronization
neighbor 193.200.1.2 remote-as 61211
network 77.77.77.0 mask 255.255.255.0
!
ip classless
!
!
line con 0
!
line aux 0
!
line vty 0 4
login
!
!
end
With today’s use of e-mail you almost can’t afford to lose a single e-mail so let alone your entire mail archive, Calendar items and Contacts.
This guide is all about backing up and restoring your Outlook Data. It describes various methods and explains which method is best to be used in which scenarios.
• Locating the pst-file
• Relocating the pst-file (optional)
• Backup pst-file
• Restore pst-file
• Export pst-file
• Import pst-file
• Backing up individual items
• Backing up an Exchange mailbox
• Restoring the Exchange mailbox
• Tools
Locating the pst-file
Before you can make a backup you’ll need to know what to backup first. In the case of Outlook in a home environment, all data is generally stored in a single file with a pst-extension. The pst-file is also known as Personal Folders and is able to store several mail, contacts, journal, notes and calendar folders.
You can locate your pst-file by using one of the following methods;
• Make sure you include hidden and system files and folders when searching for a pst-file.
• For Outlook 2007 and previous on Windows XP the default location is;
C:\Documents and Settings\%username%\Local Settings\Application Data\Microsoft\Outlook\
• For Outlook 2007 and previous on Windows Vista, Windows 7 and Windows 8 the default location is;
C:\Users\%username%\AppData\Local\Microsoft\Outlook\
• For Outlook 2010 on Windows XP the default location is;
C:\Documents and Settings\%username%\My Documents\Outlook Files\
• For Outlook 2010 and Outlook 2013 on Windows Vista, Windows 7 or Windows 8 the default location is;
C:\Users\%username%\Documents\Outlook Files\
• You can also locate the file by using;
Right click the root folder (probably Outlook Today)-> Properties-> button Advanced-> field Filename
• If you have multiple pst-files you can get an overview via;
o Outlook 2007 and previous
File-> Data File Management…
o Outlook 2010 and Outlook 2013
File-> Account Settings-> Account Settings-> tab Data Files
Tool Tip!
While making a copy of the pst-file will effectively backup your Outlook data, it will not include any mail account configuration settings (mail profile), templates or signatures. If you want to include this into your backups as well you can use the backup tool “Outlook Backup” from ABF Software. The backups can also be scheduled so you won’t have to worry about it again.
Relocating the pst-file (optional)
I assume lots of you have already relocated the “My Documents” folder to a more convenient location by right clicking it on the Desktop-> Properties-> tab Target. I’ve got mine set to D:\My Documents so I won’t have to rescue my data in the (worst) case that I have to reformat my C:\ drive.
As I see the pst-file to be data, just like a Word file, I like to have it where I keep all my important documents; in the “My Documents” folder. In the “My Documents” folder I have a folder called “My Outlook” where I store the file in.
Note:
If you are using Outlook 2010 or Outlook 2013 you can skip the steps below as Outlook 2010 and Outlook 2013 already place the pst-files in a subfolder of the My Documents folder called “Outlook files”.
To configure Outlook with a new pst-file location do the following;
1. Make sure Outlook is closed.
2. Go to the location of your pst-file.
3. Copy it to the new location (D:\My Documents\My Outlook).
4. Rename the file in the old location to .old.
5. Start Outlook; after a warning message it will prompt you to locate the pst-file. Use the Browse button to direct it to the location you’ve set in step 3.
6. You’re done! If all is successful you can delete the renamed pst-file in the old location to get some space back on your C:\-drive. You might need to recreate some “move to folder” Wizard Rules to update the new location.
Backup pst-file
Backing up the pst-file is quite easy; you just copy the pst-file to your safe location when Outlook is closed. A safe location can be one of the following:
• another physical hard drive in your machine
• another physical hard drive in another machine
• an external hard drive
• a USB memory stick
• a Flash memory card
• a CD-R(W)
• a DVD+/-R(W)
• a backup tape
• an online storage location such as Dropbox or SkyDrive.
Restore pst-file
A backup is worthless if you can’t restore it. So we first test the back-up. Testing the backup when knowing that the original still works is a lot less stressful then as well.
To restore your pst-file, copy the file to the location where you want to work with it like:
D:\My Documents\My Outlook\Temp
Note:
If you restored the file from CD/DVD, make sure you uncheck the “Read Only” file attribute by right clicking the file and choosing Properties.
Now open Outlook and connect to the file by choosing; File-> Open-> Outlook Data File…
You can now check if the backup was successful and make sure you backed up the correct file.
In the case of a real disaster, the original pst-file would be missing or will be beyond repair. When the pst-file is missing, Outlook would have prompted you for the pst-file location. You then need to close Outlook and restore the file from backup to D:\My Documents\My Outlook as described above. Then start Outlook again and if prompted browse to the location of the pst-file.
When the pst-file is beyond repair, Outlook will start with the message that it can’t be opened and that you need to run the Inbox Repair Tool (scanpst.exe). If scanpst.exe can’t fix the pst-file either, rename the corrupted pst-file to .old and you would now be in the situation that the pst-file went missing.
Tip!
If you want to restore a pst-file of a POP3 account on a new computer or after you’ve recreated your mail profile see:
Restoring a pst-file of a POP3 account on a new computer
I’ve backed up my pst-file of my POP3 account from my old computer and now want to use it on my new computer.
I’ve been told not to use the Import feature to restore my pst-file but to reuse it when setting up my account in Outlook. That way I should be able to keep my rules, view settings and various other personalization settings.
That sounds great and I would prefer not to lose too many of my settings but how exactly do I need to restore my POP3 pst-file to keep all these things?
When setting up Outlook on your new computer or when you recreate your mail profile, it is indeed best to directly configure it with your original POP3 pst-file rather than connecting to it afterwards.
If you created the backup of your pst-file as a direct copy of the original rather than using an Export, then you’ll indeed find various customizations are still there after a proper restore.
While the instructions below will allow you to restore your pst-file with your rules intact, it never hurts to export your rules to a separate rwz-file just in case.
Restore your pst-file to a convenient location
Before starting to configure Outlook, restore the pst-file to a location on your local hard disk which is convenient for you. For instance, place them in a folder called Outlook files in your (My) Documents folder.
Do NOT place it directly in the root of a drive such as directly under C:\. This could lead to permissions issues. Placing it in a manually created subfolder such as C:\MyData\ isn’t an issue. Even better would be to use a subfolder on a separate partition dedicated to your data such as D:\MyData\.
Also verify that after restoring the pst-file the Read-only file attribute isn’t set on for it. To check this, right click on the file and choose Properties.
Outlook 2010 and Outlook 2013
When adding your account, it is best to select the manual account configuration. This is because Auto Account Setup would otherwise configure your account as an IMAP account (if available for your account) or create a new empty pst-file when POP3 settings are found.
After specifying your account details, use the option “Deliver new messages to: Existing Outlook Data File” to direct it to your restored pst-file.
Directly configure Outlook to re-use your original pst-file
when setting up your POP3 account.
If you already have your account configured, you can use the Outlook 2007 instructions below as well but in Step 1 use;
File-> Account Settings-> Account Settings…
Note 1: Even though your rules are maintained this way, it is quite likely that you’ll have to remap your “Move to folder” rules. This usually comes down to selecting the rule, clicking on the folder name in the bottom pane and confirming the folder.
Note 2: If you restored a pst-file that was last used in Outlook 2007 or previous and had configured Outlook to leave a copy on the server, then your on-line emails will be redownloaded. For more info see the “Dealing with Duplicates” section below.
Outlook 2007
1. After adding your POP3 account, choose Tools-> Account Settings…
2. On the Data Files tab, press Add…
3. Confirm the “New Outlook Data File” dialog
4. Browse to the location of the restored pst-file.
5. Select and open it.
6. Confirm the “Personal Folders” dialog or optionally change the Name field.
7. Verify that the pst-file you just added is selected.
8. Press the Set as Default button.
9. Confirm the warning that you get.
10. Restart Outlook.
Changing the default pst-file to your original pst-file.
(click on image to enlarge).
After restarting Outlook, you can remove the newly created empty pst-file via;
Tools-> Account Settings…-> tab Data Files-> select the pst-file-> Remove
Note 1: It is important that you do not close the Account Settings dialog during this procedure and do not connect to the pst-file via File-> Open-> Outlook Data File…
Doing so will result in the loss of various meta data (including rules!) of the restored pst-file.
Note 2: Even though your rules are maintained this way, it is quite likely that you’ll have to remap your “Move to folder” rules. This usually comes down to selecting the rule, clicking on the folder name in the bottom pane and confirming the folder.
Note 3: If you previously had Outlook configured to leave a copy on the server, then your on-line emails will be redownloaded. For more info see the “Dealing with Duplicates” section below.
Outlook 2003
1. After adding your POP3 account, choose Tools-> E-mail Accounts…
2. Verify that “View or change existing e-mail accounts” is selected and press Next.
3. Press the “New Outlook Data File…” button.
4. Confirm the “New Outlook Data File” dialog
5. Browse to the location of the restored pst-file.
6. Select and open it.
7. Confirm the “Personal Folders” dialog or optionally change the name field.
8. Set the “Deliver new e-mail to the following location:” dropdown list to the pst-file you just added.
9. Press the Finish button.
10. Confirm the warning that you get.
11. Restart Outlook.
Changing the default delivery location back to your original pst-file.
Note 1: It is important that you do not close the Account Settings dialog during this procedure and do not connect to the pst-file via File-> Open-> Outlook Data File…
Doing so will result in the loss of various meta data (including rules!) of the restored pst-file.
Note 2: Even though your rules are maintained this way, it is quite likely that you’ll have to remap your “Move to folder” rules. This usually comes down to selecting the rule, clicking on the folder name in the bottom pane and confirming the folder.
Note 3: If you previously had Outlook configured to leave a copy on the server, then your on-line emails will be redownloaded. For more info see the “Dealing with Duplicates” section below.
Dealing with duplicates
When you are restored a pst-file from Outlook 2007 or previous and had your POP3 account on your previous computer configured to leave a copy on the server, then the emails that are available in the Inbox folder of the mailbox on server will be redownloaded.
What’s not included in the pst-file
While more and more settings of Outlook are stored within the pst-file, there are various files and settings which are not included that you want to take note of such as;
• Account settings
• Signatures (they can be copied from your Sent Items though)
• Custom Stationery
• Quick Parts
• AutoText
Some of these settings and files can be backed up and transferred manually or you could use an “All-in-One” Outlook backup solution such as ABF Outlook Backup
Export pst-file
It’s a general misconception that an export of your mail is a good backup. This misconception gets even bigger if you run the export and see that the default name of the file to export to is backup.pst.
The reason that an export isn’t a backup is because you will lose data during this export, even if you configure it to export all the folders and subfolders.
Amongst others, the following data gets lost during an export:
• Custom forms
• Custom views
• Message Rules
• Folder properties like AutoArchive settings
• Send/Receive history for POP3 accounts in Outlook 2010 and Outlook 2013
• and various other data and settings.
An export of your pst-file to another pst-file can be seen as a selective backup since during the export you can choose which data you want to backup. This is handy if you see no need in backing up the entire pst-file like the “Sent Items” folder or the “Funny Forwards” folder (who doesn’t have one of those?) which can get quite big over time and you might consider them as not important enough to backup.
Let’s say you only want to export your Inbox and your Contacts folder;
1. Open the Import and Export Wizard
o Outlook 2007 and previous
File-> Import and Export…
o Outlook 2010
File-> Open-> Import
(unlike the name suggests, it also includes export options)
o Outlook 2013
File-> Open & Export-> Import/Export
2. Choose Export to a file.
3. Choose Personal Folder File (.pst).
4. Select the Inbox and press Next (we do the Contacts folder later).
5. Set the file location to D:\My Documents\My Outlook\Backup\export.pst
6. Press Finish and you’ll be prompted to set properties for the export.pst file.
7. In the Name field type a descriptive name like “Export June 2004″ (yeah, I wrote this guide a long time ago but don’t worry; I still keep it up to date!).
8. Press OK to start the export.
9. To export the Contacts folder as well repeat step 1 to 4 and this time select the Contacts folder.
10. If the save location is not set to the path you’ve set in step 5 browse to it.
11. Press Finish to export the Contact folder.
12. Close Outlook and copy the exported file to your safe location as described in Backup pst-file.
Import pst-file
Importing a pst-file can only be done in a working Outlook situation, like when you’ve reinstalled your machine, configured Outlook and now want to restore your Inbox and Contacts.
Importing a pst-file can be done in two different ways; automatically through a wizard or manually by dragging and dropping.
Before importing, restore your pst-file:
Copy the file to the location where you want to work with it like; D:\My Documents\My Outlook\Temp. If you restored from CD/DVD, make sure you uncheck the “Read Only” file attribute by right clicking the file and choosing Properties.
Restore through the Import and Export Wizard
1. Open the Import and Export Wizard
o Outlook 2007 and previous
File-> Import and Export…
o Outlook 2010
File-> Open-> Import
o Outlook 2013
File-> Open & Export-> Import/Export
2. Choose Import from another program or file.
3. Choose Personal Folder File (.pst).
4. Browse to the location where you’ve restored the pst file. For instance:
D:\My Documents\My Outlook\Temp
5. Set the options to “Include subfolders” and “Import items into the same folder in:” and select the folder that is listed as your Outlook Today folder set in the dropdown list.
6. Press Finish to complete the import.
7. Restart Outlook and remove the export.pst file from the Temp directory if desired.
Restore manually
1. Choose File-> Open-> Outlook Data File…
2. Browse to the location where you’ve restored the pst file. For instance:
D:\My Documents\My Outlook\Temp
3. You’ll now see an additional set of folders added to your folder list which you can expand. Expand the list and select the Inbox folder
4. In this folder select the messages you want to restore to the original Inbox folder
5. Drag & drop them to the default Inbox folder
6. Do the same for the Contacts folder. You might want to set your view to a list view so you can easily select and move the items.
o Outlook 2007 and previous
View-> Current View-> Phone List
o Outlook 2010 and Outlook 2013
tab Home-> group Current View-> List
7. Now that the importing is complete, right click the pst-file in Outlook added in step 2 and choose Disconnect.
8. Restart Outlook and remove the export.pst file from the Temp directory if desired.
Backing up individual items
Sometimes it’s more convenient to backup a single item. Think about account login information you’ve received by e-mail. Backing up single items is very easy but depending on the format that you choose, you may not be able to import them back in Outlook anymore.
You can choose File-> Save as… and then choose in which format you want to save the message. If you want to be able to open them on just about any system you can choose the txt or htm format. Choose the msg-format if you want to be able to open or import them in Outlook again.
To easily save several messages in the Outlook format (msg), you can select those messages and drag & drop them out of Outlook into an Explorer window. When you save them in the msg-format, any attachments that might have been included in the message are saved within the msg-file as well.
To quickly restore saved msg-files to Outlook, you can simply drag & drop them from an Explorer window back into Outlook.
Backing up an Exchange mailbox
Backing up an Exchange mailbox is the task of the Exchange administrator. Since this is managed on the Exchange server, it’s beyond the scope of this article.
However in some cases it’s good to have a backup for yourself as well. This is especially true if you are a mobile user and you synchronize with the Exchange server so you’ll have your messages available when you are not connected to the Exchange server.
If you are not able to connect to the Exchange server for a long time but you’ll have to make sure you can always reach your e-mail, you might want to export your messages as well. This way you’ll have a backup of the mailbox in case something happens to the cached off-line mailbox. See the Export section for more info on how you can export certain folders.
Restoring the Exchange mailbox
Restoring the Exchange mailbox is also a task of the Exchange administrator. Here I’ll describe how you can use the exported pst-file when the off-line mailbox gets lost or scanost.exe can’t repair it and you won’t be able to connect to the Exchange server for a while.
Outlook 2007, Outlook 2010 and Outlook 2013
1. Go to Control Panel-> Mail-> button Data Files…
2. Press the Add… button.
3. Outlook 2007 only;
Select whether it’s an Outlook 97-2002 or Office Outlook pst-file (in the example we’ve created an Office Outlook file but it doesn’t matter which one you choose when you add an existing pst-file).
4. Browse to the location where you’ve restored the pst file. For instance:
D:\My Documents\My Outlook\Temp
5. You’ll get a details overview; press OK
6. Set the file as the default delivery location by selecting it and pressing the button “Set as Default”.
7. Start Outlook and see that it adds the other default Outlook folders in case you haven’t exported these.
8. Cancel all security prompts you might be getting from the Exchange account.
For Outlook 2002/2003
1. Go to Control Panel-> Mail-> button E-mail Accounts-> button Next.
2. Cancel all password prompts you might be getting from the Exchange Account.
3. Now press the button New Outlook Data File…
4. Outlook 2003 only;
Select whether it’s an Outlook 97-2002 or Outlook 2003 pst-file (in the example we’ve created an Outlook 2003 file but it doesn’t matter which one you choose when you add an existing pst-file).
5. Browse to the location where you’ve restored the pst file. For instance:
D:\My Documents\My Outlook\Temp
6. You’ll get a details overview; press OK
7. Now set the default delivery location to the pst-file you’ve just added by using the dropdown list.
8. Start Outlook and see that it adds the other default Outlook folders in case you haven’t exported these.
9. Cancel all security prompts you might be getting from the Exchange account.
For Outlook 2000
1. Go to Control Panel-> Mail
2. Press Add…
3. Browse to the location where you’ve restored the pst file. For instance:
D:\My Documents\My Outlook\Temp
4. You’ll get a details overview; press OK
5. Cancel all password prompts you might be getting from the Exchange Account (Work Offline).
6. Press the Delivery tab.
7. Now set the default delivery location to the pst-file you’ve just added by using the dropdown list.
8. Start Outlook and see that it adds the other default Outlook folders in case you haven’t exported these.
9. Cancel all security prompts you might be getting from the Exchange account (Work Offline).
Tools
Outlook Add-in: Personal Folders Backup
The Personal Folders Backup download creates backup copies of your .PST files at regular intervals, making it easy to keep all of your Outlook folders safely backed up. Although the download site states that it works for Outlook 2002 or later, it actually still works for Outlook 2000 as well.
Backup script(http://www.howto-outlook.com/files/Backup_Outlook_Script.zip)
A Guru created this batch in order to be able to schedule Outlook pst-file backups by using Scheduled tasks in Windows. Since I always have my Outlook open a simple copy to backup isn’t possible without an “open file backup” service.
Outlook Backup (tip!)
ABF Outlook Backup is a backup and synchronization tool for MS Outlook. It allows you to backup and restore your messages, address book, settings, accounts, message rules, junk email lists, signatures, and even your Internet favorites. It also works great for migrating your Outlook data, settings and accounts from one machine to another; the version of Windows and Outlook don’t even have to be the same. This tool is compatible with Windows 8 as well!
If you decide to order use ABF-HT2GL to get a discount.
WDS SERVERDC – potreban je DHCP
– u c:\Deploy kopiramo datoteke, pa share na everyone
– install WDS rola – prebacivanje na CLI2 –
– Windows deployment services konzola
na server ( desni, configure server) next, next, na kraju oznaci repsond to all…( known and unknown) i kvačica
boot image – next, lokacije bi bila C:\Deploy\winpe.wim
serverdc.racunarstvo.edu… desni,proterties – PXE response, oznaci respond i require… te staviti 3 sekunde
POWERSHELL wdsutil /Set-Server /Autoaddpolicy /Message:“Pricekajte dok administrator ne odobri boot.“
Referentni PC (CLI2) – instaliramo 7zip
– c:\Windows\System32\Sysprep\Sysprep (out-of-the-box, generalize i shutdown) – prebacivanje na SERVERDC –
– nakon SERVERDC konfiguracije konfiguriramo na CLI2 boot preko mreže, palimo CLI2, ENTER, te approve boota na serverdc
– pokreće se CMD: net use M: \\serverdc\deploy
– dism /capture-image /imagefile:M\Win8.wim /capturedir:C:\ /Name:Win8
serverdc boot image, pa na image desni i disable
boot image, add boot image lokacije ovaj put c:\deply\boot.wim..next, next
CLI1 instalirati simx64 (Windows System Image Manager..),dodati u domenu win system imager konzola
File -> windows image, \\serveddc\deploy\win8.wim..yes,yes..
file – new answer file
file – save answer file as i ime… \\SERVERDC\reminst\unattend
serverdc WDS, install images, add install image, u polje group WINDOWS8, next, next, next
desni na server… properties, client, enable unattend…. i pod x64 uefi odabrati datoteku unattend, ok
CLI1 izrada autom. datoteke…
windows image prošiti Components
amd64_Microsoft-Windows-international-Core-WinPE_6.3.9600
setupUIlanguage….
amd64_Microsoft-Windows-Setup_6.3.9600
DiskConfiguration
Disk
CreatePartitions
ModifyPartitions
UserData (sve)
WindowsDeploymentServices (sve)
Branchcache serevrdc napravimo novi scope sa default gateway ( server1 ), DNS 10.10.10.1 (dc)
gpedit.msc
computer…admin temp..network..lanman server
hash publication for branchcash – enable
Hash publication actions – Allow hash publication only for sharedfolders on which BranchCache is enabled simulacija spore brzine Computer Configuration-> Windows Settings create new policy, ime, npr 100 kbps copy C:\Windows\System32\mspaint.exe C:\ShareDC
ROLA – File and Storage Services-> File and iSCSI Services
BranchCache for Network Files server1 dodati novi mrežni adapter PMI pa start
na taj adapter staviti novi skope koji smo napravili gore na DCu (default gateway IPh) DNS 10.10.10.1 (dc)
ROLE – File and Storage Services-> File and iSCSI Services
BranchCache for Network Files
Remote Access
onda označi BranchCache next
označi routing, nexe next install
start-rras, enter
server1, configure….next, LAN routing next, finsh
start service
server1-IPv4, new routing protocol, dhcp relay agent
desni na dhcp relay agent, new interface
označi ethernet ( onaj interface sto smo dodali ), ok
desni na dhcp relay agent, properties
u polje server address 10.10.10.1 (dc), add, ok
cli1 & 2 dodati novi PMI adapter
serverdc shareDC, share, enalbe BranchCache, ok – Branchcache se uključuje na razini dijeljene mape…
server1 Branchcache poslužitelj – pa idemo kroz powershell:
Enable-BCHostedServer –RegisterSCP
Get-BCStatus
serverdc napraviti GP, edit – Computer Configuration-> Policies-> Administrative Templates-> Network-> BranchCache:
Turn on BranchCache…enable
Enable Automatic Hosted Cache Discovery by Service Connection Point…enable
Configure BranchCache for network files…enable maximum rout trip …(milisec) upisi 0, ok
CMD: netsh branchcache show status all (na cli)
Windows klaster serverdc instaliranje iscsi role ( iscsi target, remote access(routing))
rras (lan routing…finish)
general (routing protocol, rip…)
server manager ( iscsi…task, new iscsi virtual disk)
c:, next, ime disk1, next… target NEW preko IP jednog servera i drugog)
jos jedan disk….
jos jedan disk…. server1 & 2 postaviti adrese…
iscsi initiator…
tab discovery, discover portal ( ip od dc-a, 192.168.1.1)
tab targets, oznaci i connect server2,1 postaviti diskove (online, inicijalizacija, MBR, Simple) /refresh server2,1 dodati rolu: File and Storage Services-> File and iSCSI Services
File server
features, failover clustering
server1 failover claster manager validate, dodati server1 i server2, next next finish
create cluster, dodaj servere1, 2, ime, ip staviti samo 10.10.10.0/24 i staviti ip 4
kzos.racunarstvo…. storage,disk…
serevrdc dozvole/ desni klik na racunala properties, security, advanced, pa add, select principal
odabrati da trazi i racunala i naći klaster ( KZOS )
ukluči samo Create all child objects i Delete all child objects server1 Failover claster manager – kzos.racunarstvo…. storage,disk, Add to Cluster Shared Volume
roles, configure roles, create…. File server….10.10.10.5
onda na taj napravljeni…desni i add file share, propreties, tab failover -> allow failback – Immediately
Povezivanje domena server2 nova suma, domena….
server 1 ce biti default gateway server1 rras – pokrenuti… server2 napravi korisnika i stavi ka u domadmin grupu serverdc dns, forward…new stub..algerba.edu, next next finsh
desni na algebra.edu i transfer from master server2 dns, forward…new stub..racunarstvo.edu, next next finsh
desni na racunarstvo.edu i transfer from master (F5) serverdcactive directory domain and trusts
desni, properties, new trust, algerba.edu,
oznaci forest trust, one-way: outgoing,
both this domain and the specified. domain, selective auth., yes, confirm.. finish. Može i na properties “Validate”
AD -> uključiti advanced -> properties nekog OU -> security -> dodati usera iz druge domene
Mailbox server: uloga koja direktno surađuje s Active Director imeničkim servisom, Client Access server ulogom. Mailbox server sadrži poštanske sandučiće za korisnike i na njemu se odvija obrada podataka u Exchange okruženjima. Ne komunicira direktno s klijentima.
Client Access server: uloga koja vrši autentikaciju objekata koji pristupaju Exchange Mailbox Serveru. Također, djeluje kao proxy poslužitelj. Ne vrši obradu podataka u Exchange okruženju. Drugim riječima, nema mogućnost naknadno isporučiti e-poštu već ju nužno šalje Mailbox poslužitelju. Sva komunikacija s klijentima se odvija putem Client Access poslužitelja.
Edge Transport server: uloga koja se implementira na rubne dijelove mreže i služi za isporuku i primanje poruka s Interneta. Također obnaša sigurnosne funkcije poput anti-virusne i antispam zaštite.
Alati za administraciju:
Exchange Administrative Center: web konzola povezana s Exchange bazom. Namijenjena je osnovnoj (jednostavnoj) administraciji u scenarijima kada su potrebne izmjene (izrada, brisanje i sl.) malog broja objekata.
Exchange Management Shell: linijsko sučelje (engl. Command Line Interface) namijenjeno administraciji Exchange Servera putem PowerShell komandleta. PowerShell ima značajnu ulogu u Exchange okruženjima. Znanja PowerShella iz prethodnih kolegija će nam ovdje biti od presudne važnosti. Koncept Exchange PowerShella je identičan onome u „klasičnom“ PowerShellu i svodi se na pronalazak i izvršavanje odgovarajućeg administracijskog komandleta.
Outlook Web App: web konzola poznata pod skraćenim imenom (akronimom) OWA je pristupna točka korisnika do njihove e-pošte, kalendara i imenika. Pri instalaciji Exchange poslužitelja predefinirano je omogućena za sve korisnike kojima je izrađen pretinac.
Gornji alati će nam omogućiti konfiguraciju objekata kao što su:
pretinci: prosto rečeno, pretinac (engl. Mailbox) je kontejner asociran s korisničkim računom u kojem se pohranjuju poruke e-pošte, kalendar, kontakti i ostali korisnikovi podaci. Pretinac je pohranjen u Exchange bazi. Exchange korisnik mora imati izrađen pretinac kako bi mogao koristiti e-poštu.
grupe: objekti namijenjeni masovnom slanju poruka e-pošte. Točan naziv za ovu vrstu grupa je distribucijske grupe (engl. Distribution Groups). S tim pojmom ste se susreli još na kolegiju Administracija operacijskih sustava. Tamo ste naučili da se korisnici grupiraju u sigurnosne grupe kojima je moguće postavljati dozvole pristupa i distribucijske kojima nije moguće postavljati dozvole pristupa. Distribucijske grupe sadrže korisničke račune i pojednostavljuju komunikaciju u situacijama kada, primjerice, želite članovima cijelog odjela tvrtke poslati obavijest e-poštom. U Exchange okruženju postoji i dinamička distribucijska grupa. Za razliku od „obične“ grupe dinamička nema fiksan popis članova. Dinamičkoj grupi se prilikom slanja poruke e-pošte svaki put iznova određuju članovi na osnovu zadanih kriterija (primjerice, trenutni članovi nekog odjela, djelatnici koji se nalaze na službenom putu i sl.). Dinamičke grupe su pogodne u okruženjima gdje je razmjerno velika fluktuacija djelatnika unutar tvrtke (prelasci u druge odjele, poslovnice i sl.).
kontakti: objekti koji referenciraju korisnike izvan vaše Exchange (ili Exchange online) organizacije. Svaki kontakt ima eksternu adresu e-pošte.
kvote: kao i kod datotečnog poslužitelja Exchange poslužitelj koristi diskovne kvote. Diskovne se kvote postavljaju korisnicima kako bi potrošnju diska održali u razumnim granicama. Kvote je moguće postaviti u tri razine. U prvoj razini se korisniku samo prikazuje upozorenje da je dostupni diskovni prostor pri kraju, u drugoj se korisniku onemogućuje slanje poruka e-pošte a u trećoj se onemogućuje slanje i primanje e-pošte.
DHCP ipv4 scope-advanced-split scope – add server x2 aktivacija scope-a kasnije
ipv4 – new superscope – activate ipv4 – configure failover
DNSSEC – DNS – SERVERDC->Forward Lookup Zones -> desni klik DNSSEC – Sign the Zone
GPO – Computer-> Policies->Windows Setting->Name Resolution Policy -> Suffix „racunarstvo.edu“ + Enable DNSSEC + Require DNS clients to check that the name and address has been validated by the DNS server
SM konzola -> Task -> iSCSI virtual disk location .. next,next … Select a method to identify the initiator prozor IQN kopirati string + CHAP
Na drugom serveru -> iSCSI initiator Properties -> 1. Configuration – > CHAP, 2. Target server1.racunarstvo.edu“ -> Connect & Advanced: Enable CHAP log on
SM – File and Storage services -> Storage Pools -> New Storage Pool -> Virtual disk -> New virtual disk … next,next … ReFS & finish
DeDuplikacija ->AddRole – iSCSI -> Data Deduplication -> Finish, desni klik na volumen, configure Data DeDuplication. PS – Start-DedupJob –Volume F: -Type Optimization
NetworkLoadBalance – IIS + NLB -> IIS Default web site c:\website + desno providers NTLM move up
NLB klaster->Network Load Balacing Manager -> Cluster -> New, ime, ip, www, multicast. Rule remove, pa add 80, add 443. Desni klik na domenu -> Add host to cluster
DAC
Add role File Server resource Manager. GPO Computer -> Policy -> Admin Templates -> System -> KDC, KDC support for claims… Enable i always. Urediti odjel usera, dodati grupe
AD administrative center -> DAC -> Claim Type-> New -> department & Display name Odjel, niže add Uprava i Prodaja. Resource Properties Department i Confidentiality ENABLE & Department properties add Uprava.
Resource Property Lists, Global Resource Property Lists <- provjerit jesu ovdje Confidentiality i Department
File Server Resource Manager – Classification Management-> Classification Properties refresh-> Create Classification rule odabrati folder i string „Tajno“ & Evaluation Type -> Re-evaluate existing property values & uključiti Overwrite the existing value. Run Classification With All Rules Now
Properties na datoteku & Classification confidentiality, properties na folder i Classification Department
DAC – Create Access Rule -> Target Resource Edit, Central Access rule „Odjel“-> Add condition: Resource- Department-Equals-Value-Uprava , zatim dodati Authenticated users u permission. Add condition:
User-Odjel-Equals-Resource-Department
DAC – Create Access Rule -> Target Resource Edit, Central Access rule „Tajno“ Add Condition: Resource-Confidentiality-Equals-Value-High Permission na Authenticated modify, User-Odjel-Equals-Value-Uprava & Device-Group-Member of each-Value & dodati računala uprave
New-> Central Access Policy „zastita“, Add „Odjel“, Add „Tajno“
GPO -> Computer -> Policies -> Windows Settings -> Security Settings -> File system -> central access policy Manage „Zastita“ Add
Advanced Security Settings for ShareDC. Kliknite na karticu Central Policy i zatim kliknite opciju Change -> Zastita.
WorkFolders -> Task -> New Sync share, odabrati mapu, Add Svi_korisnici, Isključite opciju Automatically lock screen and require a password, create
GPO: User -> Policies -> Admin Temp-> Windows Components -> Work Folders (Specify WF settings – enabled, url: serverdc.racunarstvo.edu i Force Automatic setup)
Computer Configuration-> Policies-> Windows Settings-> Security Settings-> Public Key Policies – Trusted Root Certification Authorities -> Import „C:\Sahre\serverdc.p7b“ finish
configure active directory certificate services on the srv
certification authority
cert auth web enrollment
online responder
enterprise, root ca
create private key
rsa sha1
Online responder – klijentima pruža informacije o opozvanim certifikatima na osnovi CRL liste. odgovori koji se saljju klijentu moraju biti potpisani certifikatom (izdajemo ga na temelju predlozaka za OCSP protokol)
Certification Authority konzola
certificate temlates – manage
ocsp response signing – properties – security
add – object types = computer + serverdc
autoenroll i enroll
certificate templates – new – certificate template to issue
ocsp response signing
Certifikat za IIS poslužitelj – IIS poslužitelj na kojem se nalazi online responder mora imati odgovoarajući certifikat – izdajemo ga na osnovu predložaka (koji ćemo prvo konfigurirati)
Certification Authority konzola
certificate templates – manage (konfiguracija)
web server – properties – security
add – object types = computer + serverdc
enroll
web server – duplicate template
template display name = SERVERDC-IIS-CERT
publich certificate in Active Directory
security + server dc + enroll + autoenroll
superseded templates + add + web server
certificate templates – (izdavanje) – new – certificate template to issue
serverdc-iis-cert
IIS konfiguracija – na IIS poslužitelju certifikat asociramo s odgovarajućim web servisom
comp conf + policy + wind settings + security settings + public key policies – encrypting file system + create data recovery agent + gpupdte/force
Backup baze certifikata
certification authority – server dc – all task + backup ca
item to backup = private key and ca certifikate + cert database + log
path
NAP – DHCP
NAP – zaduzen za provjeru zdravlja klijenta koji se zele spojiti na domensku mrezu – ovisno o zdravlju, NAM će dopustiti pristup mrezi, potpuno izolirati klijenta ili mu dopustiti pristup smo najnuznijim resursima. zdravlje klijenta se određuje prema nekoliko kategorija
windows firewall – ukljucen na svim mreznim vezama i na svim profilima
antivirus – ukljucen i instaliran s najnovijim definicijama
antisypware aplikacija – isto kao antivirus
windows azuriranja – instalirana azuriranja operacijskog sustava – moguce je odrediti i vrstu azuriranja koja nuzno mra biti instalirana (npr kriticne sigurnosne nadogradnje)
Klijenti koji od DHCP servera traze tcp/ip postavke moraju zadovoljiti uvijete nametnute NAP kriterijima – ako ne zadovlje, dhcp server ce klijentu polati postvake koje ce mu nemoguciti komunikaciju s ostalim racunalima na mrezi (npr. mreznu masku 255.255.255.255 – ip adresa bez klase) – ova vrrsta napa je najlaksa za konfiguraciju i ne zahtijeva certifikacijske servise – klijentima se eventualno moze dopustiti pristup nuznim resursima (npr serveru s javnim dijeljenm mapama) dok ne isprave propust u zdravstvenom stanju
osnovna konfguracija
dodat ćemo grupu koja ce poslužiti za smještaj računala koja podliježu nap provjeri
OU racunala + new group (domain local) + properties + add cli1
na cli1 – mrezne postavke=dhcp + firewall off
instalacija i konfiguracija potrebnih uloga (dc)
add role = network policy and access services (dhcp instaliran od prije)
konfiguracija nap-a
network policy server -> nps local -> configre nap
network connection method = dhcp
policy name = OSMIS
nextalica + finish
konfiguracija sigurnosno – zdravstvenih uvijeta za nap klijente
network access protection -> system health validators -> windows security health validator + settings + new
friendly name = firewall
windows security health validator- iskljuciti sve osim firewalla
NAP postavke moramo preko Group Policyja povezati s računalima. GP objekt postavljamo na organizacijsku jedinicu Racunala. Budući da ta organizacijska jedinica sadržava i poslužitelj SERVER1, primijenit ćemo sigurnosni filtar (sjetite se kolegija AOS) na grupu NAP_Racunala koju smo izradili na početku vježbe. Tako smo povezali NAP postavke samo s računalima u grupi NAP_Racunala, a ne sa svim računalima unutar organizacijske jedinice. Jednako ćemo tako u ovom koraku konfigurirati i tekst poruke koju će NAP servis prikazati korisnicima čija računala ne zadovoljavaju sigurnosne kriterije.
group policy management + racunala + create a gpo….. name= nap_dhcp + edit
Computer Configuration-> Policies-> Windows Settings-> Security Settings-> Network Access Protection-> NAP Client Configuration + enforcementclients
DHCP Quarantine Enforcement Client + enable
User Interface Settings + ser interface
title = obavijest admina
description = U tijeku je konfiguracija vašeg računala
nap_dhcp
security filtering
remove authenticated users
add NAPgrupa
gpupdate /force
klijentski nap servis
services.msc
Network Access Protection Agent + start
pristup nuznim servisima – dc
Network Policy Server + policies + network policies + OSMIS Non NAP-Capable
settings + nap enforcement + configure
new group
add server dc + resolve
OSMIS Noncompliant
settings + nap enforcement + configure + domenski sevisi
automatsko uskladivanje s nap zahtijevima
privremeno onemoguciti nap da bi klijent mogao primijeniti gp postavke
dhcp + raspon + propertis + network access protection + use default nap profile + apply + disable for this scope + apply
Sada možemo preko Group Policyja konfigurirati NAP klijentski servis koji će automatski usuglasiti računalo s NAP stavkama, ali i prikazati poruku koju smo u prethodnoj cjelini konfigurirali za prikaz korisnicima. Iako smo u prethodnoj cjelini taj servis uključili na računalu CLI1, to nije dovoljno. NAP će provjeravati veliki broj računala u produkcijskom okruženju i svako od njih mora imati uključen pripadajući servis.
Group Policy Management Editor konzola. Proširite mapu Computer Configuration-> Policies-> Windows Settings-> Security Settings-> System Services. + nap + enable
ponovno ukljucivanje dhcp nap:
enable for this scope(vidi gore)
use osmis
DFS
add role – DFS namespace i DFS replication (na 2 servera)
DFS Management
Namesapce -> New namespace
NAmespace server = “SERVER1”
NAmespace NAme and settings -> ime poslovanje,
Edit settings – Administrators have full access; other users
have read-only permissions
Prikazuje se Browse for Shared Folders ekran. Kliknite gumb New Shared Folder.
Prikazuje se Create Share ekran. Postavite opcije:
a. Share name: upišite Arhiva
b. Local path of shared folder: upišite C:\DFS_Shares\Arhiva
c. Shared folder permissions: označite opciju Use custompermissions i kliknite gumb Customize -> Prikazuje se ekran Permissions for Arhiva. Grupi Everyone dodijelite Full Control
dozvolu i kliknite gumb OK
next, next, ok
Desni klik na mape -> replicate folder
potrebne dvije mape -> dodati mapu sa drugog servera
Nakon što smo uspješno povezali dvije mape na različitim poslužiteljima, konfiguriramo replikaciju:
1. Prikazuje se ekran Replicated Group and Replicated Folder Name. U polje Replication group name upišite REP_Arhiva i kliknite gumb Next.
2. Prikazuje se ekran Replication Eligibility. On prikazuje poslužitelje s kojih je moguće replicirati mapu. Kliknite gumb Next.
3. Prikazuje se ekran Primary member. Iz izbornika odaberite SERVER1 i kliknite gumb Next.
4. Prikazuje se ekran Topology Selection. Odaberite stavku Full Mesh i kliknite gumb Next.
Naglasimo da je Hub-spoke topologija nedostupna jer zahtijeva najmanje tri poslužitelja.
5. Prikazuje se ekran Replication Group Schedule and Bandwith. Ostavite predefinirane opcije i
kliknite gumb Next.
6. Prikazuje se sažetak odabranih opcija. Kliknite gumb Create.
7. Pričekajte dok se replikacijska topologija ne uspostavi. Možebitne pogreške pri izradi topologije prikazuju se na kartici Errors.
8. Kliknite gumb Close.
9. Prikazuje se informacija o mogućem kašnjenju replikacije. Označite opciju Do not show this again i kliknite gumb OK.
10. Minimizirajte DFS Management konzolu.
Assemblio je alat za sastavljanje idealnog računala za neku cijenu. Sve što trebaš napraviti je upisati koliko novca planiraš potrošiti i za što ćeš koristiti računalo, a mi ćemo sastaviti listu najboljih komponenti računala za tvoj novac.
PCI-Z je odličan alat iza kojeg stoji domaći autor, Bruno Banelli. Služi nam za automatsko traženja drivera za nepoznati hardver. 🙂 Iznimno ga je jednostavno koristiti. Dovoljno je preuzeti odgovarajuću inačicu (riječ je od verziji za 32-bitne ili 64-bitne Windowse), pokrenuti ga i pričekati trenutak da PCI-Z izvuče identifikatore i u preglednoj listi prikaže sve PCI/PCI-E/PCI-X uređaje koje je prepoznao zahvaljujući bazi na koju se oslanja.
Download sa složbene stranice:
http://www.pci-z.com/
PCI-Z 1.2
Namjena: Prepoznat će neidentificirane PCI/PCI-E/PCI-X uređaje i olakšati pronalazak drivera
Microsoft Security Essential je antivirusni softver potpuno besplatan za preuzimanje i korištenje onima koji posjeduju legalnu verziju Windows XP, VISTA, Windows 7 ili 8 operativnih sistema.
Napravljen je kao alternativa besplatnim anitvirusnim alatima, ali se tokom rada pokazao boljim i manje zahtjevnim od mnogobrojnih „izvikanih“ rješenja. Pomaže prilikom zaštite od virusa, softvera za špijuniranje podataka i ostalog softvera koji može napraviti štetu na vašem računaru. Lakoća upotrebe, vrlo jednostavan i razumljiv korisnički interface uz vrlo efikasnu jezgru za prepoznavanje i uklanjanje virusa, predstavlja gotovo savršen izbor za kućne korisnike.
Instalacija softvera je vrlo jednostavna i zahtjeva jako malo vremena. Nakon što ste preuzeli odgovarajući paket softvera i pokrenuli instalaciju, softver će pokrenuti postupak provjere valjanosti operativnog sistema. Ukoliko je sa vašom licencom Windows OS-a sve u redu, slijedi malo duži korak koji se odnosi na „update“ baze virusa radi njihovog efikasnog prepoznavanja što omogućuje bezbolan postupak uklanjanja. Ovisno o kvaliteti i brzini internet veze ovaj korak traje najviše par minuta. Kada je baza osvježena i obogaćena podacima, potpisima i profilima novih virusa, biće vam ponuđena opcija da izvršite brzu provjeru (Quick Scan) stanja vašeg sistema. Ovo nije obavezan korak, ali se toplo preporučuje svim novoinstaliranim korisnicima.
U svakom slučaju godinama ga koristim, nikada problema, vrlo jednostavan i brz i uz sve to i besplatan. Također besplatan je i za tvrtke do 10 instalacija.
Sada odpetljajte žice i složite ih po nekom standardu:
Malo žice poravnajte, ako su ovakve ko meni, odrežite vrhove da su vam sve žice jednake dužine i ugurajte u konektor:
Provjerite sa svih strana da su sve žice do kraja gurnute:
Stavite u kliješta za krimpanje i stisnite do kraja:
Vratite pregibnicu do konektora i kabel je gotov:
Za kraj možete testirati kabel sa cabel testerom (ili ga jednostavno uštekat u router/switch i komp i vidjet da li radi 🙂 ):
U grubo postoje nekoliko vrsta spajanja mrežnih kablova:
Straight-through – koristi isti standard na oba kraja kabela (ili T568-A ili T568-B). Ovakvim kablom spajamo slijedeće mrežne uređaje:
* switch – router
* hub – router
* switch – PC
* hub – PC
Cross-over – koristi različite standarde na krajevima kabela (na jednom kraju je T568-A, a na drugom T568-B). Ovakvim kablom spajamo slijedeće mrežne uređaje:
* switch – switch
* switch – hub
* router – router
* hub -hub
* PC – PC
* Router – PC
Rollover mrežni kabel – koristi se na CISCO uređajima za spajanje na konzolni port.
DIMM – za desktop
SD RAM – synchronous dynamic random-access memory – (Koristilo se od početka devedesetih do sredine 2000-tih – Pentium 1 i slično)
DDR- – Double data rate synchronous dynamic random-access memory – 184-pin DIMM
DDR2 – starija memorija, ali još na tržištu i u konfiguracijama – 240-pin DIMMS
DDR3 – aktualna memorija
SO-DIMM DDR, DDR2, DDR3 – za laptope
Kod odabira RAM memorija treba obratiti pažnju na više faktora:
kapacitet- količina podataka koja se može zapisati
brzina- protok podataka
latencije- vrijeme odaziva
Dual chanel-način rada RAM-a u kojem se udvostručava propusnost kroz memorijski kontroler (Intel C2D/i5/i7 8×0,AMD Athlon/2/Phenom/2…) Triple channel-način rada RAM-a u kojem se utrostručava propusnost kroz memorijski kontroler (intel i7 9xx) ECC (error correcting code) je mogućnost otkrivanja promjene podataka zbog nasumičnih grešaka od 1bit pa naviše. DDR SDRAM – Doube Data Rate SDRAM, memorija kod koje se podatci prenose na ulazni i silazni brid sabirnice (FSB), čime se efektivno udvostrucuje propusnost memorije u odnosu na SDRAM. Ovo se danas nekoristi više. DIMM – Dual In Line Memory Module – Danas najčešće pakiranje memorije pri čemu se čipovi nalaze s obje strane. EDO RAM – Extended Data Out, poboljšana FPM memorija koja je imala nešto bolje perfomanse, danas se nekoristi. JEDEC – Joint Electron Device Engeringing Council – Vijeće koje je zaduzeno za standardnizaciju memorijskih modula Latencija – Vrijeme koje protječe od zahtjeva za podatkom do dobivanja podatka. Oznacavaju se sa 4 brojke, a svaka znaci (za primjer 4-4-4-12) tCAS Collumn Adress Strobe Vrijeme potrebno da se popuni odredeni stupac memorije tRCD Row Adrees to Collumn Adress Day – vrijeme koje protječe od definirianja retka i njegovog odabira do definiranja stupca. tRP – Row Precharge Time – vrijeme potrebno da se prekine pristup odredenom redu memorije nakon sto je ocitana informacija i da se otvori pristup sljedecem retku tRAS – Actire to precharge Delay – najmanja količina vremena u kojoj red moze biti aktivan, a prije nego što se deaktivira.
Kod kupovine RAM-a treba voditi računa da matična ploča podržava takav tip i brzinu memorije
Tijekom godina najproširenije sučelje je bilo Paralel ATA. Da bi ne dugo zatim nakon pojave interneta i potražnje za većim bandwithom PATA i SCSI standardi postali ne dovoljno učinkoviti u pogledu brzine i felksibilnosti. Paralelno sučelje je omogućivalo paralelan prijenos podataka tj. slalo je više bitova istovremeno. Skoro sva osobna računala dolaze sa barem jednim paralelni sučeljem na koje se mogu spojit HDD, CDROM te slični uređaji. SCSI – small computer system interface
je standard za paralelno sučelje koji korsite Apple računala, PC i drugi Unix sistemi za priključivanje preiferija kao što su diskovi i printeri na računalo. SCSI pruža prijenos podatka brzinom od 80 MB / s. Nadalje na jedan SCSI port se može priključitit više uređaja, tako da SCSI možemo promatrati kao I/O sabirnicu umjesto običnog sučelja. ATA – još poznat kao IDE
je disk implementacija koja ima integriran kontroler na samom disku. ATA se koristi za povezivanje tvrdih diskova, CD-ROM pogona i sličnih uređaja, te podržava 8/16-bit sučelje koje podržava transfer do 8.3MB / s za ATA-2 i do 100MB / s ATA-6 Standardom.
Dakle, kakve veze paralelno sučelje ima s SAS (Serial Attached SCSI ) i SATA (Serial ATA)?
Pa ima puno, zato što se zbog limitacija u arhikteturi paralelnih sučelja stvorila potreba za razvijanje serijske tehnologije poput SAS i SATA. Nasuprot paralelnog toka podataka, podaci se prenose serijski, tako što se u jednom prijenosu više bitova zamota u pakete te se tako prenose, to im omogućuje veću brzinu prijenos od paralelne tehnologije. Serial Attached SCSI (SAS)
SAS ili serijski priključen SCSI je nasljednik pralelno priključenog SCSI koji je point-to-point vezan sa serijskim perifernim sučeljem u kojem su kontroleri povezani direktno s diskovima. SAS je napredniji od običnog SCSI zato što omogćava istovremeno spajanje više uređaja (do 128) različitog tipa i veličina sa tanjim i dužim kablovima. Komunicira pomoću full-duplex signala te podržava prijenos podatka od 3.0 GB / s. I jos k tome SAS diskovi mogu biti hot-plugged
Serial ATA (SATA)
Još poznat kao SATA je nasljednik paralelnog ATA diskovnog sučelja. SATA je povezan serijskom vezom – jedan kabal s najmanje četiri žice za uspostavljanje point-to-point veze između uređaja. Brzina prijenosa za SATA diskove počinje od 150 MB/s.
SATA proširuje mogućnosti ATA sučelja i nudi početnu brzinu prijenosa od 150 MB / s i nakon godina razvoja, postaje mainstream za diskovna sušelja. Dok je na drugu stranu nasljednik SCSI sučelja SAS koji postiže brzine od 3 GB / s.
SAS uredađji mogu komunicirat sa SATA i SCSI uređajima (utori na SAS uređajima su identični onima na SATA uređajima). Ključna razlika izmedu SCSI i SAS uređaja je ta što SAS ima dva priključka za prijenos podataka, sto povečava sigurnost. Jer ako jedan priključak zakaže još uvijek postoji komunikacija na drugom priključku.
Infernal machine je uređaj koji kada napravimo može otvoriti portal u drugi “svijet” gdje se borimo protiv Ubera 🙂
Da bi napravili Infernal Machine za početak nam treba blacksmith plan koji dropa u ACT-u 4 – Silver Spire lvl 1. Kasnije za craftanje treba farmati ključeve:
Key of Destruction – Act 1, Fields of Mistery
Key of Hate – Act 2, Dahlgur Oasis
Key of Terror – Act 3, Stonefort
*Kada u sred igre znate npr. da vam fali Key of Hate, ali se ne sjećate u kojem Actu to farmate zapamtite da su poredani i po abecedi *Da bi dobili drop morate imate 5 stackova Nephalem Valor buffa. (i za key i za dijelove za prsten)
Što je veći Monster Power level veća je šansa da će key dropat. Kažu da je na MP 10 100% šansa. (još sam preslab da bi igrao na MP10)
Kada napravite portal mašina nestaje te morate opet framati ključeve za novu mašinu.
Act 1 Keywarden je lagan. Puca tri fireballa, jailer i molten.
Act 2 Keywarden je težak ako ste ranged. Stvori oko sebe “balon” koji jako usporava vaše ranged speelove i pošto se stalno pomiće skoro ga nikad ne pogode.
Act 3 Keywarden se teleportira i periodično baca kišu leševa koju je relativno lagano izbjeć jer se na podu prvo prikaže bijeli led.
Act4 Keywarden vam smanjuje heal za 75%. Treba pazit da se ne stoji u vatri. Sve u svemu, od ovog zadnjeg trebamo samo jedan plan koji naučimo kod blacksmitha i nakon toga samo farmamo ključeve.
Kako i gdje otvoriti portal
Jednom kada sve skupite i napravite Infernal Machine morate napraviti igru Act1 – zadnji quest “Return to New Tristam”. Otiđite do healera i udarite po vratima iza njega. Uđete kroz vrata i kad ste unutra right klik na mašinu u vašem inventoriju.
Uberi
Uber Ghom & Rakanoth – The Realm of Chaos
Prvo ubijete Ghoma – zbog dima koji ostavlja po cijeloj prostoriji. Droapju Devil’s Fang dio za prsten.
Uber Siegebreaker & Zoltun Kulle – The Realm of Turmoil
Probajte izbjegavati charge od Siegebreakera i ubijajte Zoltana. Dropaju Vengeful Eye dio za prsten.
Uber Skeleton King & Maghda – The Realm of Discord
Ubijete prvo Skeletona, izbjegavajte one muhe od Maghde. Dropaju Writhing Spine dio za prsten.
Plan za prsten kupujete od NPC-a u ACTu 2 pokraj portala u gradu. Plan košta 2 000 000 golda. Možete birati koji vam je glavi stats za ring – Dexterity, Strenght, Intelligence ili Vitality. Da bi napravili prsten trebaju vam sva 3 dijela i 50 000 golda.
We use cookies on our website to give you the most relevant experience by remembering your preferences and repeat visits. By clicking “Accept All”, you consent to the use of ALL the cookies. However, you may visit "Cookie Settings" to provide a controlled consent.
This website uses cookies to improve your experience while you navigate through the website. Out of these, the cookies that are categorized as necessary are stored on your browser as they are essential for the working of basic functionalities of the website. We also use third-party cookies that help us analyze and understand how you use this website. These cookies will be stored in your browser only with your consent. You also have the option to opt-out of these cookies. But opting out of some of these cookies may affect your browsing experience.
Necessary cookies are absolutely essential for the website to function properly. This category only includes cookies that ensures basic functionalities and security features of the website. These cookies do not store any personal information.
Any cookies that may not be particularly necessary for the website to function and is used specifically to collect user personal data via analytics, ads, other embedded contents are termed as non-necessary cookies. It is mandatory to procure user consent prior to running these cookies on your website.